
Neck Region on the Cello
The term “Neck Region” refers to the entire fingerboard area up to (and including) what is traditionally called the “Fourth Position” (with the first finger on “E” on the A-string, “A” on the D-string etc). Above this position, we enter the Intermediate Region in which the hand and fingers, unlike in the Neck Region, now move around independently from the thumb because the thumb, from the fourth position upwards, is blocked in the crook of the neck. A discussion about the division of the fingerboard into different regions is found on the following page:
BASIC NECK REGION HAND POSTURE: MONKEY HAND, DUCK FOOT OR EAGLE CLAW
In the Neck Region, we use specific hand postures and fingering systems that characterise and differentiate this region from the higher fingerboard regions (see below). The best description I have heard of our basic left-hand posture in this region of the fingerboard (thank you Irene Sharp) is to compare it with that of a monkey hanging (swinging) from a branch. To continue with the animal kingdom analogies, apart from thinking “monkeyhand” we can also think “duckfoot” in the sense that our left hand in this region should be much more like a duck’s flat webbed foot than the bird of prey’s curled claw. The different possible hand and finger postures are explored in more detail below, and also in the articles dedicated to Finger/String Contact and Paw or Claw ?
COMFORT IN THE NECK REGION: CLOSED AND EXTENDED FINGER CONFIGURATIONS
Our basic neck region hand configuration, with a semitone between each finger, is a very natural and comfortable posture. We can call this the “close” (or “closed”) position. This is the most natural, comfortable hand posture that we will ever use on the cello. Added to this comfort, the availability of the open strings also contributes to making life easy for our left hand in the Neck Region and it is for these reasons that almost all cello beginners start exclusively in this region, only slowly working their way up into the Intermediate and Thumb regions. In fact, the evolution of cello repertoire has followed the same progression as the beginner cellist. With some notable exceptions (Boccherini and Haydn), the rise of the cello repertoire up the fingerboard into the Intermediate and Thumb Regions has been quite progressive over the centuries.
But this description of idyllic comfort unfortunately only applies to the non-extended hand, in which we have a minor third interval between the first and fourth fingers. When we need a major third interval between the first and fourth fingers then our hand comfort situation changes considerably for the worse. The extended neck position hand posture(s) are looked at on their own dedicated page:
NECK REGION: ALWAYS EASY ?
Even though most “easy” music stays in the Neck Region, this doesn’t mean that all music in the Neck Region is easy. The first 5 Bach Suites, 6 Vivaldi Sonatas, and most orchestral and chamber repertoire up until the romantic period, limit the cello’s range to the Neck Region (with occasional use of the mid-string harmonic). But nobody can say that this is all, therefore “easy” music even though their composers may have thought that by staying in this “safe” region, everything they wrote would be easily playable. Extensions, fifths and strange key signatures (in which we can no longer use open strings) along with other technical difficulties can still make life very difficult in this “easy” fingerboard region. The greatest problem of the Neck Region is that it is here, in the lower positions, that the distances between the semitones are the greatest, and thus it is in this region that the “normal” extensions are the largest.
In fact, the extended first position is actually one of the “worst”, most uncomfortable hand postures on the cello, certainly for cellists with a small hand. Not only is this the largest extension on the fingerboard but also, the proximity of the rigid end-of-the fingerboard (the nut) means that the string under the already-strained extended back first finger is also at its most inflexible. This makes it hard to stop (push down). For the comfort (and safety) of our extended first finger, we need to make sure that the string is as low as possible to the fingerboard where it passes over the nut into the cello scroll (if it buzzes then it is too low).
As we go from the lower strings to the higher strings, the extended position becomes more uncomfortable because of the design of our hand (the thumb is too short). Thus, for cellists with a small hand, playing a simple passage in first position extended backwards on the A-string can actually be more uncomfortable than playing a virtuoso passage high in the Thumb Region.
Things get much worse however in the “flat keys”, where we first lose the use of the open “A” string (with three flats) and then the open “D” string (with four flats). The supposed “naturality” and “comfort” of the Neck Region rapidly transforms itself into absolute discomfort in the flat keys. We not only have to do the biggest and nastiest major third extension, but now we also have to stretch or jump (or a combination of the two resembling a magic trick) a “double extension” (perfect fourth) across strings in order to play a simple scale. Suddenly that legato scale, the most fundamental building block of music that sounds so easy, becomes a task of great difficulty, requiring almost sleight of hand. This is a shame because, unfortunately, Eb major and C minor are very common keys. Bach’s Fourth Suite in Eb (Mi bemol) is a good example of this. If only he had written it in D major: it would sound “the same” but be infinitely easier to play well. Cassadó actually did this, playing this suite in concerts, and even publishing an edition of it, in D major. We can be thankful to Bach for the scordatura (A string tuned down to G) that he recommends for the Fifth Suite (also with three flats) as it makes life so much easier to be able to use that open string. Perhaps he (or a cellist friend) came to the scordatura idea for the Fifth Suite because the Fourth Suite was sounding so bad?
And with the sharp keys we have a similar problem, with the difference that with the sharp keys we lose our open strings progressively from the bottom as the keys get sharper. While the loss of the open C string in keys with two sharps is not particularly significant for our comfort, the loss of the open G string (in keys with three sharps) and then the D string (with four sharps) eliminates the possibility of a comfortable ergonomic scale across the open strings in the same way that the flat keys do on the higher strings.
What a shame the cello is not like a harp, for which the tuning of the instrument can be changed according to the key of the music, in order to always be able to use the open strings!
Let’s look now at some specificities of playing in the Neck Region:
HAND INCLINATION IN THE NECK REGION: DOUBLEBASS OR VIOLIN POSTURE ?
The fingers of the left-hand of violinists tend to be inclined “backwards” on the fingerboard, with the ends of the fingers “pointing” towards the bridge. Double-bassists, in contrast, tend to have their fingers more square to the fingerboard. We cellists can do either, and often need to choose which posture we prefer. Often this choice is dictated to us by the characteristics of our hand (shape, size, and relative finger lengths) as well as by the nature of the music (need for extensions, higher finger on lower string etc).
This question becomes exponentially more important in the extended position, which is why it is discussed in much greater detail on its own dedicated page in the “Extensions” department.
Doublebass or Violin Hand Posture?
THE THUMB’S ROLE IN THE NECK REGION
Because the thumb doesn’t actually “play” any notes when it is tucked away behind the cello neck, and because it is not only inaudible but also basically invisible there, it is very easy for us to just take its supporting role for granted and ignore what it might actually be doing, This unawareness can have very serious consequences. To illustrate this we will use a metaphor from the world of car mechanics: ignoring the thumb’s function behind the cello neck is comparable to ignoring the cooling system for a car engine. If we don’t check that our car has sufficient coolant liquid then we run the risk that the whole motor will overheat and ultimately seize up. At the cello, if we don’t check periodically that the thumb is relaxed, and that it is not squeezing against the cello neck, then we run the risk of our left-hand seizing up.
This problem of excessive thumb pressure is an easy trap to fall into because in the Neck Region we have two ways of applying left-hand finger pressure to the strings (in order to stop the notes):
- with arm weight [YES!!!]
- with the pincer grip (between thumb and the fingers) [NO !!!!!!].
When the thumb is under the cello neck it is “in opposition to” (opposite to) the fingers, which is the perfect position in which to apply (use) a pincer grip. The ability to use the pincer grip is something that differentiates the primates from “lesser” species of animals, this grip allowing for the sophisticated manipulation of objects (tools) by the highly-evolved primate hand and brain. Unfortunately however, this “sophisticated” grip (in an evolutionary sense) is positively counterproductive for cello playing, for which the technique we want to use in order to apply finger pressure to the strings has much more in common with a monkey swinging from a branch than with that same monkey manipulating a tool. So, in other words, while the temptation to press with the thumb in opposition to the fingers is very natural and very strong, it is also very dangerous.
It would be great to have a high-tech pressure sensor along the back of the cello neck, which could measure and record at all times how much pressure was being applied by the thumb on it. It would be so interesting to see just how much thumb pressure behind the cello neck the finest cellists use when they are playing their different passages/notes ……. and how much finger pressure ……
HOW TO ELIMINATE THUMB PRESSURE BEHIND CELLO NECK
When we release all our fingers from the fingerboard (to play an open string for example) then we absolutely need our thumb’s contact behind the neck as a spatial sensor and positional reference (see Positional Sense). But when we have any other finger in contact with the fingerboard then that finger occupies this function and we can now relax, and even release, the thumb’s contact with the back of the cello’s neck. The total release of the thumb’s contact with the back of the cello neck is easiest to do in exercises in which we don’t have any shifts and in which we always have at least one finger down. In fact, probably the best material for practising playing without any thumb/cello neck contact are the Cossmann Doubletrill Exercises and their preparations.
A DIFFERENT METHOD FOR NAMING (NUMBERING) THE FINGERBOARD POSITIONS?
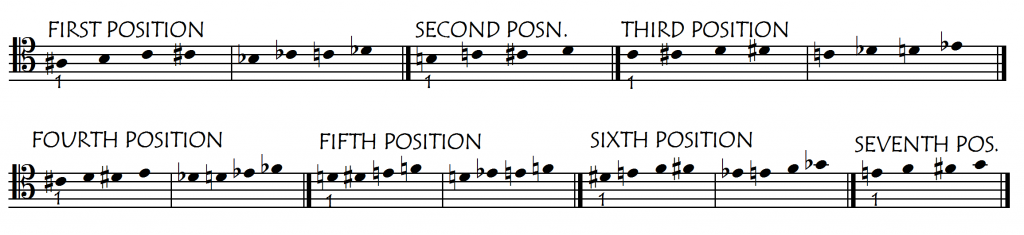
Traditionally the left-hand positions up the fingerboard in the neck region are numbered as “Half”, “First”, “Second”, “Third” and “Fourth” according to the note on which the first finger finds itself, as shown in the following examples:

In this system, it doesn’t matter if the first finger note is natural, flattened (b) or sharpened (#): the position number stays the same.

For this reason, although these position numbers have a certain musical (harmonic) logic, they are too vague and undefined to help us to know exactly where our hand is. While this system of nomenclature might make sense in very simple, diatonic music (the positions correspond to notes in the scale), it doesn’t make much sense “technically”, especially when we are playing music that is modulating wildly or rapidly, or that is not tonal.
A better system of position names (numbers) would be chromatic, as shown in the following example:
The extended positions (1X234 major third range) present more complications for their naming because an extended position can be either “extended up” or “extended back”. Sometimes it is quite clear whether we are extending upwards or backwards, but in other cases, this will depend on our hand size, relative finger lengths and where exactly the thumb is lying under the fingerboard:

This subject will be dealt with on the “Extensions in the Neck Region” page.
FIRST POSITION
Traditionally called “half position”, this is a position that we tend to avoid, often preferring to play in second position (traditionally called “first position”) with a lot of backward extensions. This is a shame because nowhere on the fingerboard are the note distances greater between each finger/semitone and added to this strain is the fact that the “nut” (ridge) at the end of the fingerboard is very close, meaning that we need to apply a greater force to the string to stop it against the fingerboard in this position. All of this extra effort is doubly difficult and strenuous when we are in the extended hand position.
So we need to consciously work in this position to get our hand (and brain) used to being comfortable there. For this reason, this position has its own dedicated page:
A SPECIAL CASE: “ZERO” POSITION !!!
Nobody uses “zero” position, with the first finger on the nut at the top of the fingerboard, but there are two situations in which we might want to break with tradition:
- trilling from the open string, and
- finding notes in the lowest fingerboard positions when we have no possibility of checking their pitch before sounding them
1: TRILLS FROM OPEN STRING
Trilling from an open string poses unique problems because, unlike in any other trills, we don’t have a lower “anchor” finger held down from which to do our trill over. In the case of a trill from the open string, that anchor finger is replaced by the end of the fingerboard (the “nut”). This lack of an anchor finger creates great instability: our hand is like a woodpecker (bird) hammering at a tree while hovering in mid-air rather than while standing solidly on the branch. If however, we place our first finger on the nut, then suddenly our trill becomes “normal” and easy. This takes a bit of getting used to, but is possibly worth the effort for those very few times that we might want to use it.
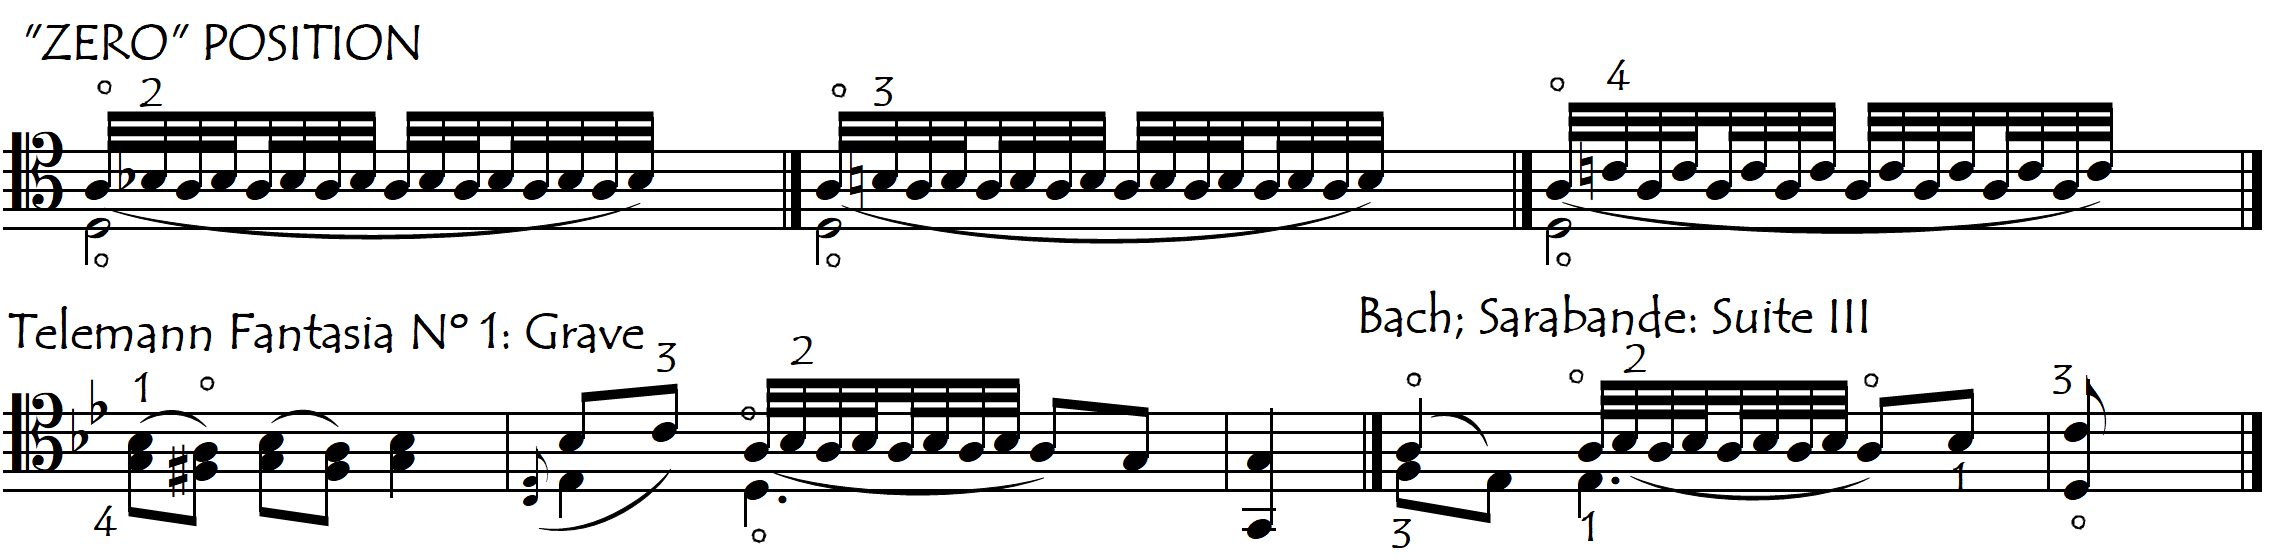
2: INTONATION SECURITY IN THE LOWEST POSITIONS
When we place our first finger on the “nut” at the top of the fingerboard (where the fingerboard ends, disappearing into the scroll of the cello) we have an incredibly clear, safe, secure physical reference for our left hand’s position. Once we get used to it, we can make use of this reference to give us absolute security in situations in which we need to place notes without any possibility of checking them aurally before they are sounded (see Positional Sense). This is mainly useful on the C-string and in orchestral playing because here the notes are so low (and the surrounding noise level so high) that even after we start playing we may not be able to hear our note to correct it. While we may not feel we need this security in what is traditionally called “first” position because we “know” that position so well, “zero” position can be especially useful for finding notes in what is traditionally called “half position”.
THE FOURTH FINGER
One of the main things that differentiates Neck Region fingerings from the Intermediate and Thumb Regions is our use of the fourth finger. The “square” hand posture that we can use in the Neck Region allows us to comfortably use the fourth finger in this region, unlike in the higher regions. However, the fourth finger is considerably weaker and less athletic than the other fingers. For this reason, we also have a special page dedicated to it:
BASIC NECK REGION EXERCISES
Here are some basic exercises for the Neck Positions, with and without extensions. These exercises can be directly printed from the screen or downloaded. They are dry and mechanical, so we can switch off our emotions. But we do however need to switch on our brains, as it is important to know at all times which notes we are playing. That way we are both building and reinforcing our mental map of the fingerboard. In some of these exercises, once we understand the simple repetitive patterns, we no longer need to read the music, so we can close our eyes and concentrate on the physical sensations and on knowing where we are (the note names). It can be useful to check the intonation now and again with the neighbouring open strings.
Getting comfortable and familiar with the fingerboard regions is best started without the added strain of extensions so the first exercises all use only “closed” position (with a semitone between each finger). Even for the experienced cellist, until our hand is warmed up we should probably start with those exercises that don’t use extensions. To firmly establish the relative finger spacings, our first exercises will not involve shifting but will be either in one position or will move “snakewise” through the positions.
There are two fundamental exercise types for our left hand, in any fingerboard region. Each develops a different type of muscle use, both of which are however absolutely necessary.
- fast, light, flowing, single notes (no doublestops)
- doublestopped exercises (usually slower)
1: DOUBLESTOPPED EXERCISES
We will start with the doublestopped exercises because these are extraordinarily efficient for building strength in both the hand and the fingers, and for establishing the positions of the fingers relative to one another (intonation). These skills (of strength and correct finger spacing), combined with the complex finger coordination skills required when we are playing on two strings simultaneously, constitute the foundation of our left-hand technique at the cello. We will use these same two types of exercises in all three fingerboard regions. For a more detailed discussion about why doublestops are so useful for our fundamental left-hand technique, look at the “Doublestops” page.
Some of these exercises are like nasty medicine: unpleasant and only to be used for medicinal purposes, but very potent (and therefore to be taken only in small doses). It is probably a good idea therefore to start gently and work up towards the more strenuous exercises. The easiest exercises with which to start are those that use the open strings as well as stopped notes. Whenever we use an open string as part of our doublestop, our hand has an invaluable opportunity for relaxation.
We must always be extra-careful not to press the thumb against the cello neck when playing these doublestopped exercises. Playing on two strings at the same time requires considerably more hand pressure than playing on only one string. The temptation to use our grip (thumb-fingers claw) to provide this additional pressure is very strong, but we must instead just use our arm weight. Probably the best way to ensure that we don’t clamp with our thumb is simply to keep the thumb totally removed from its contact with the cello during the entirety of these exercises.
The first two double-stop exercises are particularly hand-friendly: even though they are in permanent double-stops, the frequent use of the open strings allows the hand to relax. Here we are only working with the first finger/fourth finger hand frame.
Basic Doublestopped Finger Exercises in One Position (No Shifts)
Basic Doublestopped Positional Exercises: Moving Tonally Through All Positions By Stepwise Shifting
2: FAST, FLOWING, SINGLE-NOTE EXERCISES (no shifting)
Fast Fluidity Exercises in Neck Region: WITH EXTENSIONS BUT WITH NO FOURTH FINGER
Fast Fluidity Exercises in Neck Region: WITH EXTENSIONS: ALL FINGERS