
String Crossings (Bow Level Control) On the Cello
This article is concerned uniquely with the right-hand and the bow. For a discussion of left-hand factors in string-crossings, click on the following link:
Left-Hand Factors In String Crossings
The discussion that continues below, refers to our most basic, fundamental bow-level control. A lot of this material is also applicable to pizzicato, although knowing on which string our right hand is playing is made easier in pizzicato because we have the possibility of using the right thumb’s placement on the edge of the fingerboard as a spatial reference/anchor.
To jump straight into practice material and detailed specific examples, open the following pages:
BASIC BOW LEVEL CONTROL
1: GRAVITY AND THE BOW
The effect of gravity on the bow is a very curious, interesting subject, especially for string crossings, and has its own dedicated page:
Gravity And The Bow’s Natural Crossing Tendencies
2: PLAYING ON ONE STRING
The ability, to play on one string without hitting the others, is the most basic skill in bow-level control. Learning to know, by feel, on which string the bow is placed, and being able to draw the bow from one end to the other without allowing this level to vary greatly, is a very highly refined skill as we only have a few millimetres of safety margin on either side of any string before we start hitting the neighbouring strings. Especially at the frog, the difference in right-hand position between any one string and its neighbours is truly tiny.
Thus, before working on actual string crossings passages, it is useful to work on this most basic skill by doing exercises that experiment with the outer limits between one string and the next. We can experiment on each different string with many types of bow stroke – long bows, short detaché strokes, spiccato, forte, piano, sf, at the tip, middle and frog – to see just how far the bow level can be varied before actually touching the neighbouring strings. On the A and C strings we can also experiment with finding our outer limits beyond which our bow (or hand) touches (or hits) the cello body.
Just how much room (margin of error) do we have ? As a scientific curiosity, we could (with difficulty) quantify this for each string in terms of degrees (º) and/or in terms of distance. The distance measurement would be the length of the arc that the furthest extreme of the bow (tip or frog) travels (describes) when we explore the maximum range of movement on any one string with the other extreme of the bow (frog or tip). In other words, if we put our bow on any one string at the frog, how far does the tip move when we move the bow hair from “just touching the higher” to” just touching the next lower string” ? If we do the exact inverse, substituting the word “frog” for “tip” we should get exactly the same measurement. Of course, string players are intuitive engineers and physicists, and we don’t need to “know these numbers” because we sense them and adapt our body-use to them. This is why it takes so much “practice” to learn to play a string instrument well!
Every cello, every chair, every different spike length and seating posture will have somewhat different bow levels (spatial coordinates) for each string, but fortunately, we rapidly automatise these levels thanks to the aural feedback we get when we touch a wrong string. Our ears however only tell us that we are touching the wrong string when it is already too late. The eyes, in contrast to the ears, can tell us permanently where our bow level is and how close we are to the neighbouring string, before we touch it. This is why looking at our bow’s point of contact with the string is such a useful source of information when we are working on our bow-level control.
If we find our bow constantly hitting the neighbouring strings unwantedly (especially on the middle strings) this may be due to a problem of instrumental setup (lack of bridge curvature) which means that we don’t have enough vertical safety margin between the adjacent strings. It may however be also due to a lack of bow-level control.
No matter what the cause of our hitting two strings is, we may well find it useful to widen the gaps between the strings on the bridge. This has the effect of spreading them wider across the bridge’s semicircular arch, thus giving more vertical room (margin of error) for the bow on each string before it starts to touch the neighbouring string. From a standard 16mm spacing I have personally found it very helpful to widen to 17, 17.5 or even 18 mm spacing between strings. We need however to be careful of two things:
- that we have plenty of safety margin for the bow on the A string and C string sides (before hitting the cello ribs on either side) as this operation brings the bow closer to the cello’s body on the outside strings
- that our fingerboard is wide enough so that we don’t find ourselves playing with the left-hand fingers right on its edge.
SPECIAL CASE: PLAYING ON THE OUTSIDE STRINGS
If we lose our bow-level control on the middle strings then we hit the neighbouring strings. If we lose our bow level control on the outside strings (A and C) however, then we can hit wood!
We have much more room (margin of error for our bow-level) on these “outside” strings than we do on the D and G strings. Whereas the D and G strings are surrounded on both sides (hemmed in) by the neighbouring strings, the C and A strings each have a large “open space” on their “outside” (towards the cello body) into which the bow can wander safely without the risk of hitting anything. This safety distance is easy to measure: when playing on either the C or A strings with the bowhair very near to the neighbouring string, there is (on my cello at least), a distance of approximately 4 cm between the bowhair and the cello’s body. Compare this to the several millimetres of vertical distance that separate the middle strings from their neighbours!
This greater distance gives us great bow-level comfort and safety on the A and C strings, compared to the G and D strings. It means that when playing on these outer strings, the risk of accidentally touching a neighbouring string is much less than when we play on the two middle strings. On both the A and C strings, this extra distance also allows us to really play loudly, with maximum bow pressure, without having to worry about the risk of hitting the neighbouring string.
On the C string, however, there is a significant trap attached to this comfort. When playing in the upper half of the bow on the C string, we have a huge “vertical” margin of error for our bow-level control (4cm) and can relax and lower our shoulder and arm a lot before coming anywhere near to hitting the cello body with the bowhair. This feels so easy, natural and comfortable that it is very tempting! But if we do this, we can have a rude awakening. As we come in on the upbow towards the frog, there is a sudden (and fatal) trap: unless we bring our bow level closer to the G-string level, our right thumb can easily catch on (collide with) the protruding point (corner) of the cello rib. This is especially a problem in soft “sul tasto” playing (with the point of contact a long way from the bridge) because, in loud playing, the bow is closer to the bridge which keeps the hand’s trajectory away from this “danger point”. Also, for loud playing, we tend to keep our bow-arm higher, in a more active and energised position than for soft playing.
Fortunately, we seldom start an ff note at the tip of the bow because if we did, on the A string, if our bow-level control was really “off”, we could run the risk of spearing the belly of our cello with the tip of the bow. If our bow level is too “high” on the A string then we touch the wood of the rib with the bowhair. This can be especially problematic in loud percussive spiccato passages because instead of just the bowhair touching the cello belly, it is the stick of the bow that hits it.
3: HALF-CROSSINGS
Perhaps one of the best ways to develop a very careful, precise awareness of our bow levels is by experimenting with “half-crossings” in which we find the point at which we touch the neighbouring string but without losing contact with our original string. In this way, we alternate between single notes and doublestops. We can do this in both slurred and separate-bow crossing passages:
We can do the above bowings with any sequence of doublestopped notes: scales in sixths, scales in octaves etc.
Here is a study which works very much on this skill. We may want to refinger it in certain places:
Duport Study Nº 8: Half-Crossings
DIFFERENT TYPES AND DEGREES OF STRING CROSSINGS
A string crossing can be either to an adjacent (neighbouring) string or to a non-adjacent string. Crossings can also be anywhere on the continuum from totally legato (slurred smoothies) to totally separated (bounced). If the crossings coincide with bow changes then they can be “on-the-string” steps or “off-the-string” spiccato jumps. Changing our bow on a crossing actually often makes it simpler to coordinate (new bow = new string). One of the most common – and possibly the most problematic – crossing types is a slurred crossing to a neighbouring string. Let’s look now at some of the most basic and useful ideas for working on string crossings, starting with these legato smoothies.
LEGATO CROSSINGS ?
Any two slurred notes, in the same hand position and on adjacent strings, can be perfectly connected, without any silence or interruption between them. We can even make them overlap each other by blurring the string crossing (maintaining for a short time a doublestop as we change the string, see below). Theoretically, this might seem to be a perfect” legato” but it isn’t ! “Legato” in Italian means “connected” but this connection between any two notes doesn’t only refer to the smooth uninterrupted continuation of the sound but also to the smooth uninterrupted connection between the pitches, which can only be achieved by fingering the interval on the same string and with a shift. It is only when we have both continuity in the sound, and a smooth connection between the pitches (glissando), that we have the maximum degree of legato. Even with the softest, most inaudible glissando, our fingering of an interval with a shift on the same string will sound more “legato” than the smoothest string crossing (with a nice overlapping doublestop in the middle of the string crossing for maximum connection).

This fact was made clear one day in an orchestral rehearsal when the conductor kept staring irritably and asking repeatedly for “legato” in the following passage from the opening of Bartok’s Concerto for Orchestra.

Only after changing to the second fingering did the conductor finally smile. No wonder: the first fingering has 8 string-crossings and 0 shifts while the second fingering has only 4 crossings but 4 shifts. No matter how smooth, blurred and overlapping those 8 string-crossings are played, the only way to achieve a truly legato character is by incorporating shifts into our fingering.
DIFFERENT PRACTICE IDEAS FOR DEVELOPING OUR BASIC STRING-CROSSING SKILLS
FLUIDITY AND SMOOTHNESS:
We mustn’t fall into the trap of thinking that our bow has only four different, clearly defined levels (one for each string). Playing “cleanly” – with “instantaneous” bow-level changes – is like trying to shift with the left hand to a new position “instantaneously”: it leads to jerks, stiffness and coordination difficulties all of which make playing the cello feel, sound and look much more difficult. As with left-hand shifting, for fluidity and ease, we need to connect the different positions (in this case bow levels) as smoothly and imperceptibly as possible.
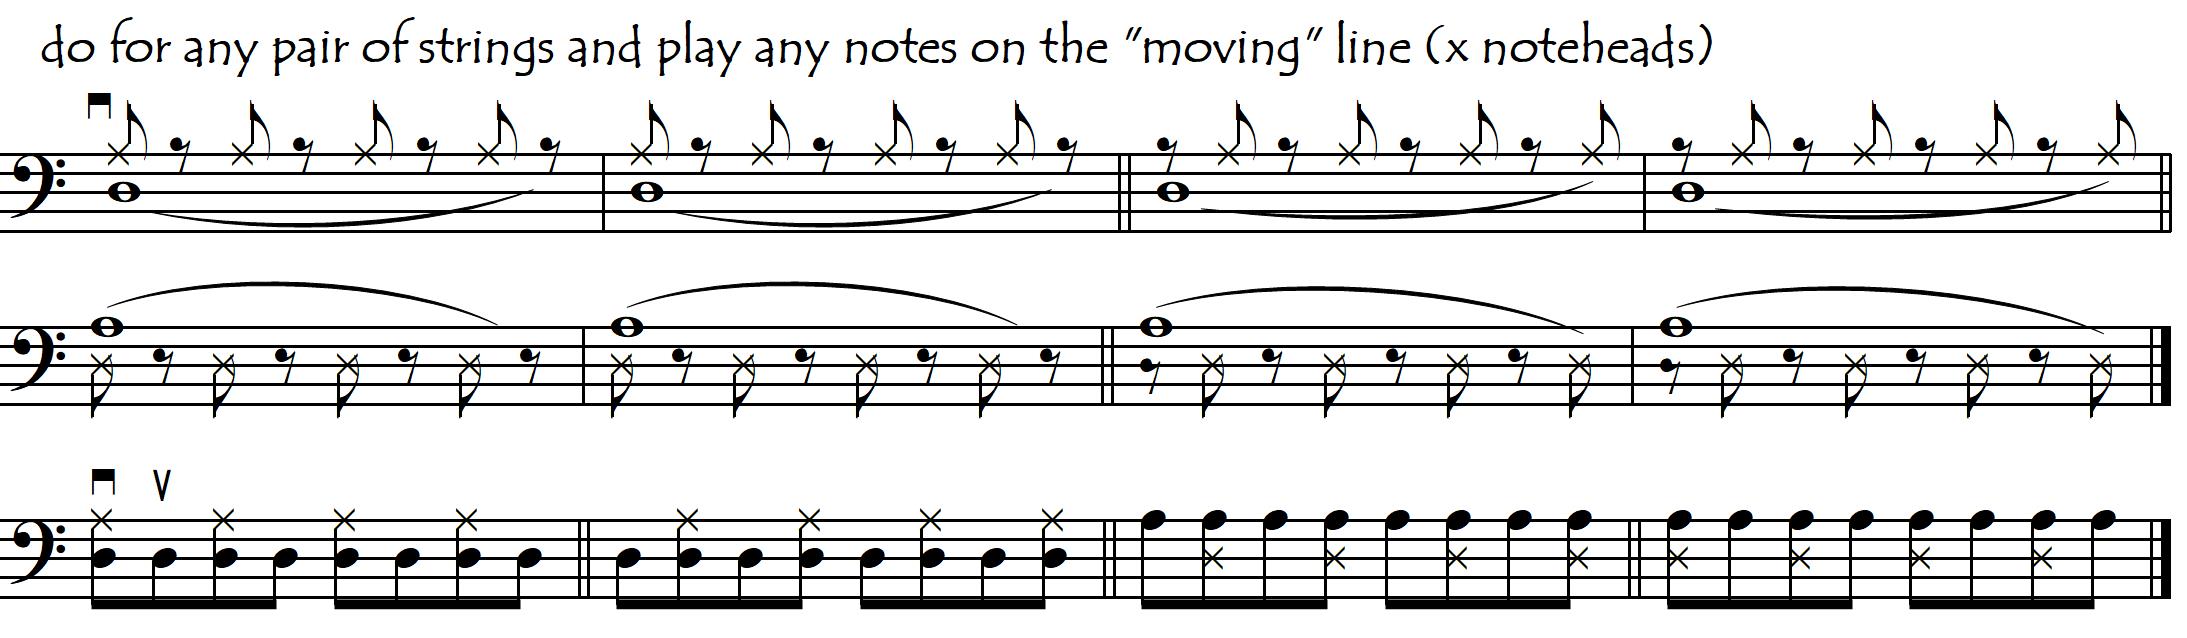
For smoothness and fluidity, rather than thinking of four separate isolated bow levels (one for each string) it is useful to think of a continuum of levels, with blurred boundaries between them in which the neighbouring strings “overlap”, like watercolour paints merging into each other. When we play a scale across the strings, for example, the arm should be doing an almost continuous string crossing, getting gradually closer to the next string as the notes move up or down. This is easiest to see (and to work on) when we use several bowstrokes on each note, as here the bow stays more-or-less in the same place horizontally (it barely moves between the frog and the tip) and we can concentrate our attention easily on its “vertical” level. During the bowstrokes before the crossing, we need to bring the bow absolutely as close as possible to the next string so that the actual moment of the string crossing is almost imperceptible. If we play each note four times then we have plenty of time to do this preparatory movement.

We can experiment with putting different numbers of bowstrokes on each string, progressing gradually from the extreme of tremolo to the other extreme of having only one bowstroke per string, as in the following exercise. We can use this principle to practice any string crossing passage across 2, 3 or 4 strings.
ECONOMY OF MOVEMENT
In passages in which we alternate between only two neighbouring strings, it makes ergonomic sense to make the crossing distance as small as possible by keeping the bow close to the mid-level between the two strings rather than rocking wildly between the two outer extremes.

BLURRING THE BOUNDARIES BY USING DOUBLE STOPS
To make our left-hand shifting smooth, we use glissandi. In the case of string crossings, one of the simplest and most efficient ways to acquire the equivalent fluidity is by using double stops as transitions between the different strings. This greatly increases not only the smoothness of our string crossings but also our awareness and control of our bow-level. We can use this technique both in musical repertoire and technical exercises (scales, arpeggios, studies etc). As we acquire more control, smoothness and fluidity we can gradually reduce the duration of the double stop until it becomes imperceptible, as shown in the following examples:
As mentioned above, this is a very similar procedure to the one that we use for creating smooth left-hand position changes, in which our use of glissando has the equivalent technical function (as a “fluidifier”) to the use of double stops in string crossings. The above examples are all slurred but this is only because it is easier to understand this concept (and use it) with slurred bowings. It makes no difference at all whether the string crossings are slurred or on separate bows: the need for fluidity and the beneficial effects of practising with double-stops are the same for both slurred and separate-bow string crossings (see below). The above exercise can also be done usefully with separate bows.
THE “RESONANCE CROSSING” FOR ARPEGGIO INTERVALS
Shakespeare didn’t play the cello, but his line “parting is such sweet sorrow” (from the play “Romeo and Juliet”) is very applicable to string-instrument playing, most notably to string crossings. Here, however, rather than between two lovers, its greatest use is in an encounter between one string and its neighbour. A clinging, reluctant goodbye, in which the departing string does not want to let go, has some great musical and ergonomic advantages
Almost any string crossing and/or string crossing passage can be usefully practised with overlapping double stops but these clinging, reluctant, “blurred” crossings” are especially appropriate for slurred arpeggio-type figures. Here, maintaining the previous note slightly longer than written, and thus letting it continue for a short time as a doublestop with the new note (on the new string) is not only physically fluid, smooth, flowing and beautiful: it also sounds great. This is a wonderful trick for making the cello sound extra-vibrant, harmonically rich and resonant. It gives us a self-created echo effect: this “overlapping” of the notes is after all the same effect as given by a church acoustic.
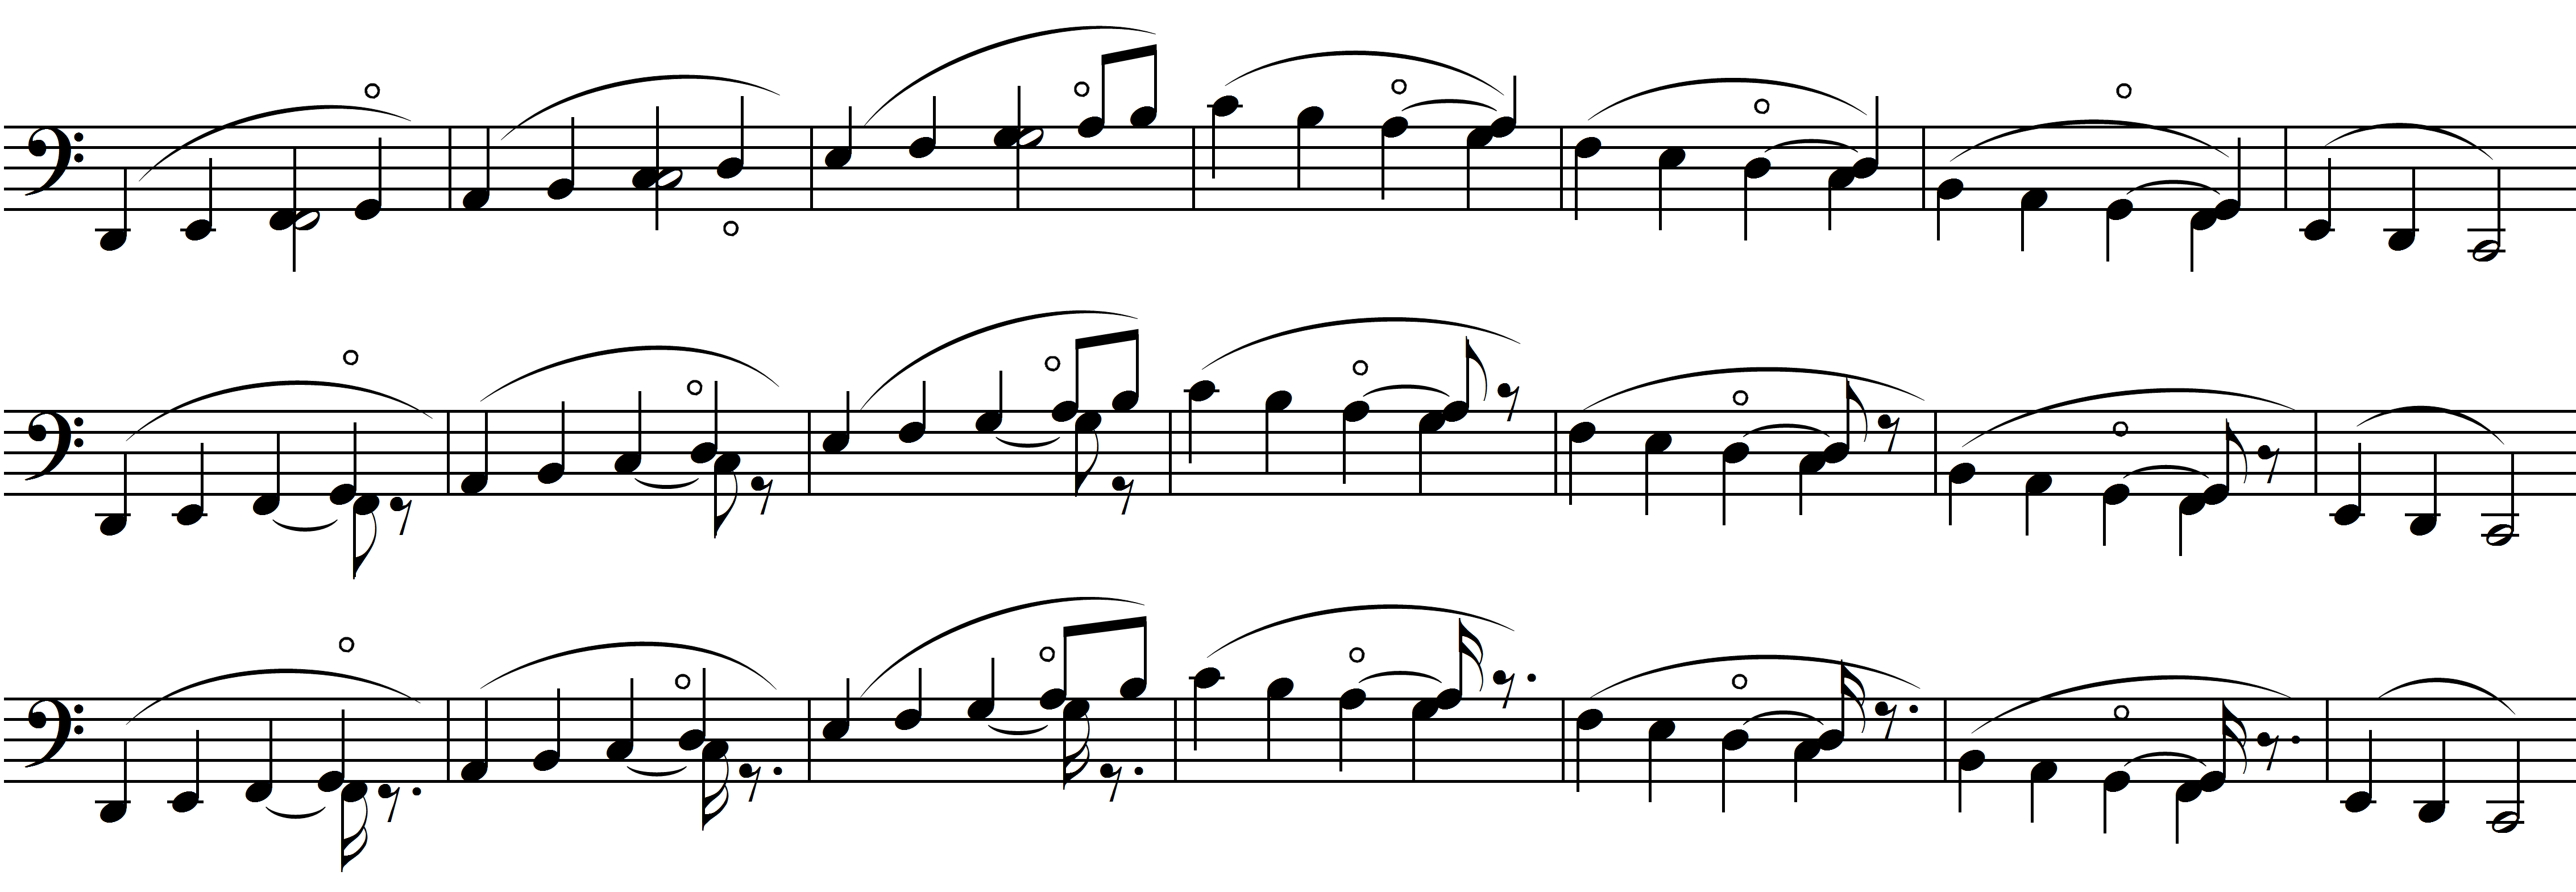
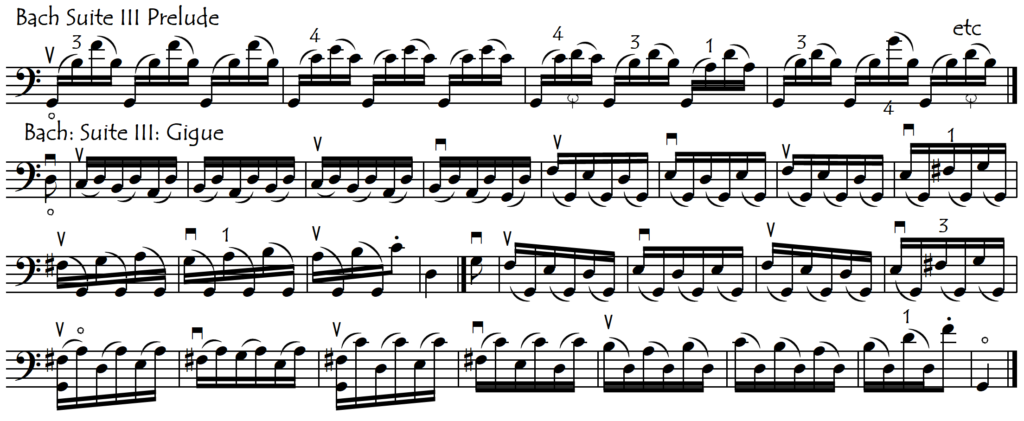
This technique can be put to very good use in the Bach Solo Suites as they are absolutely full of broken chords and broken doublestopped figures (in contrast to a more melodic type of writing). A wonderful example of this is the Prelude to Bach’s Sixth Suite (transposed down a fifth or played on a 5-string cello) with its constant flow of slurred arpeggio figures across the strings. Look at the first few bars of this Prelude with each possibility for a blurred crossing indicated by a red rectangle.
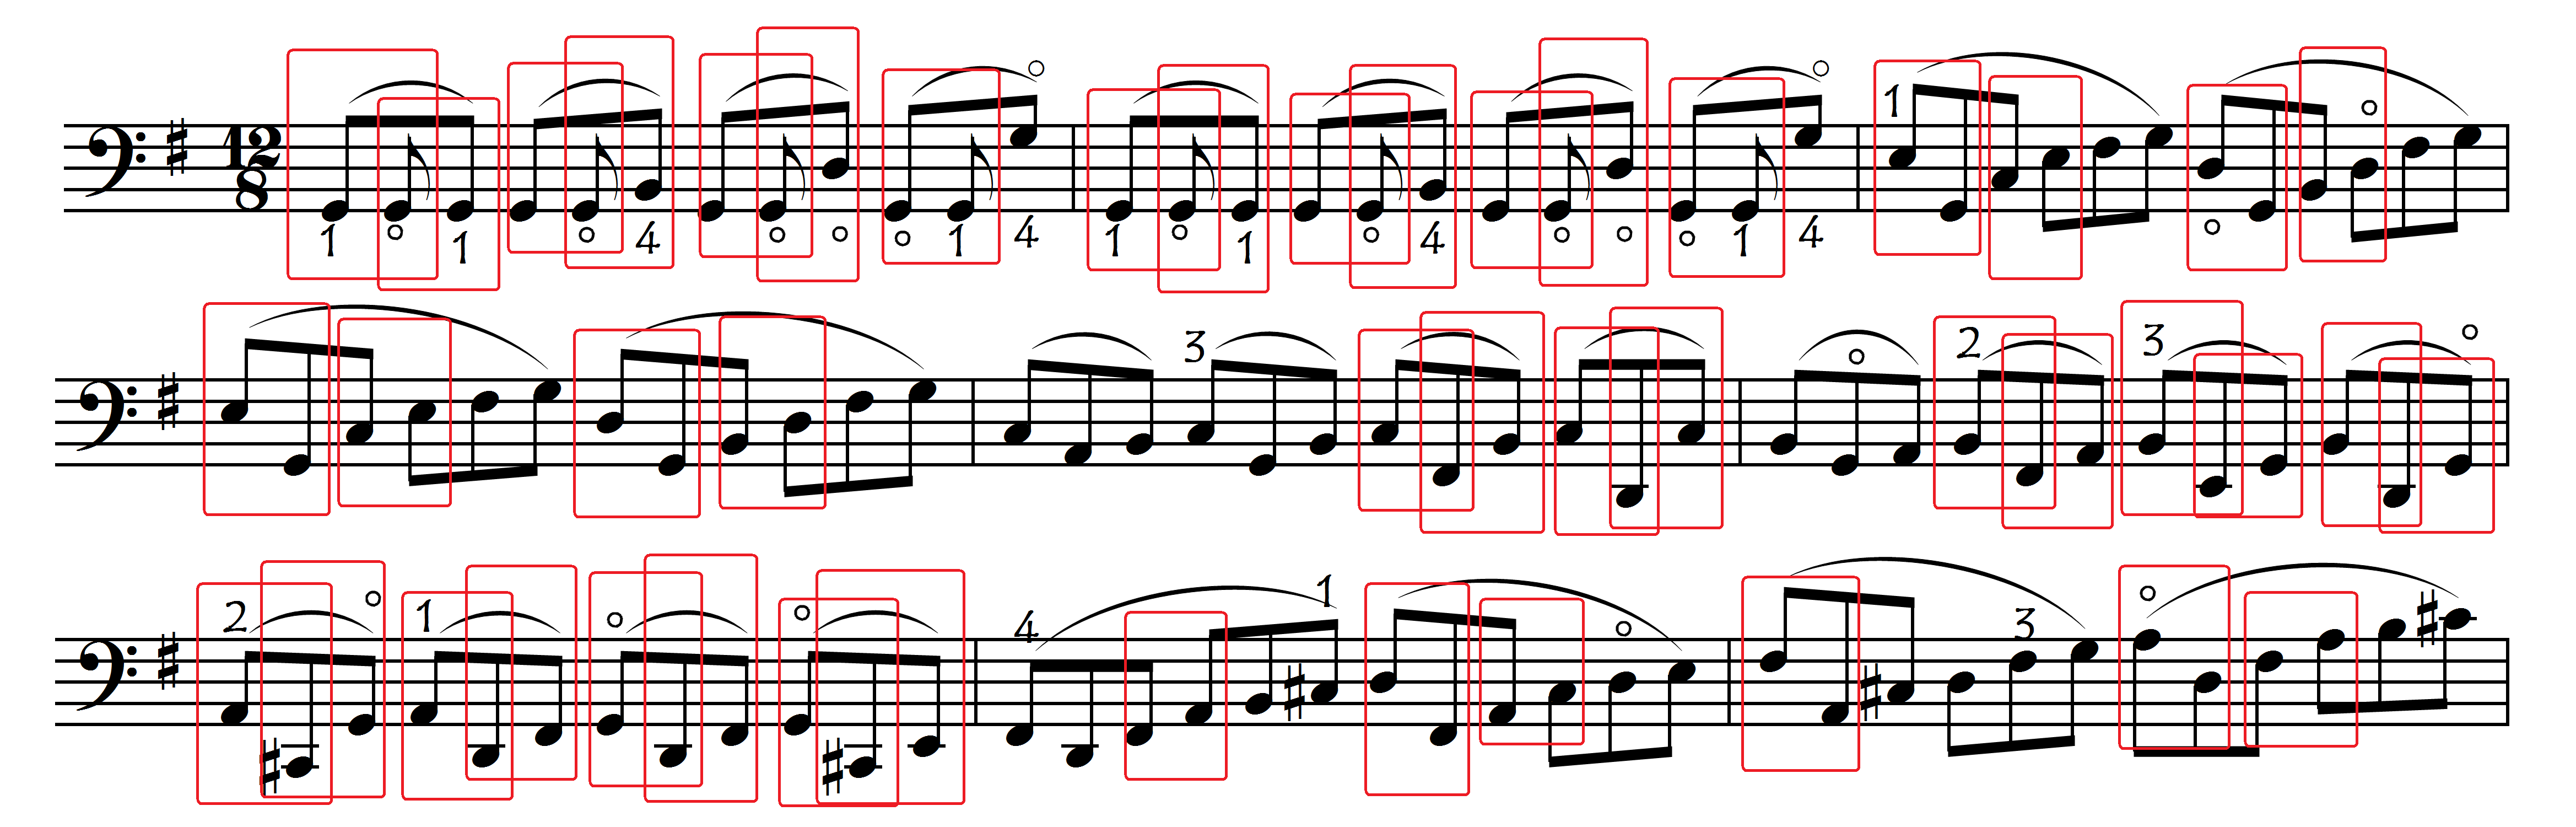
In these first nine bars there are already 46 slurred arpeggio-type string crossings ….. and this Prelude continues in the same style for another 95 bars with a total of almost 500 of these types of string crossing! Of course, this precise number will depend on our choices of bowings and fingerings: playing it with more shifting up and down the strings, and reducing the number of slurred notes, reduces the amount of these crossings. So rather than writing a boring “study” for this skill we can just play this magnificent Prelude, fingered and bowed in such a way as to give a maximum number of opportunities for practising our blurred crossing. The following link takes us to this sheet music:
Bach: Prelude of Sixth Suite as an “Overlapped Stringcrossing” Study
If we change Bach’s bowings, placing many of the string crossings in slurred pairs, the Prelude to Bach’s First Suite also becomes a wonderful introduction to (and study for) this technique. Here, as the 169 string overlaps are mostly now in pairs, they are simpler to see, understand, and control than in the Prelude to the Sixth Suite in which they are linked in longer slurs. Each possibility for an overlapped crossing is indicated within a green enclosure.
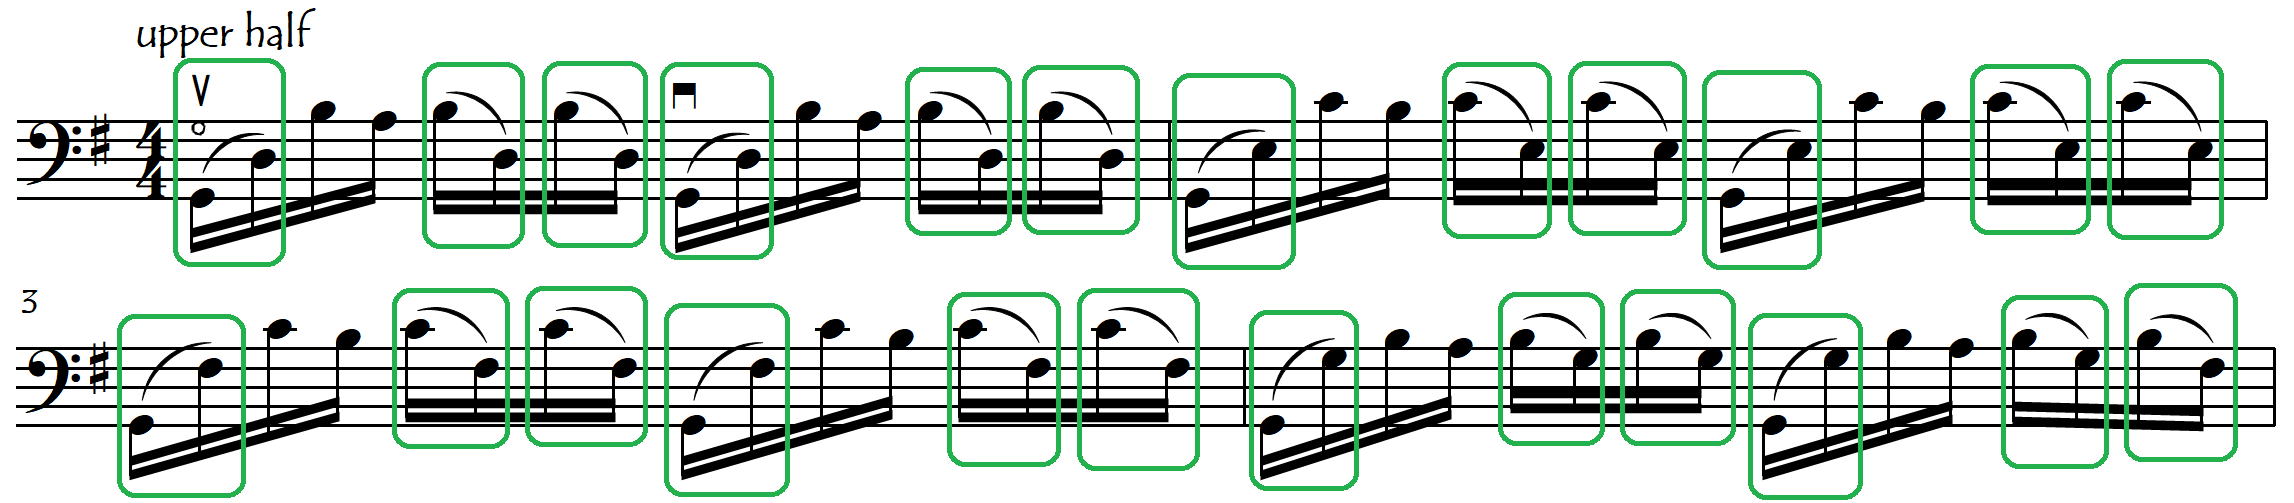
Probably the best way to get our ears and our arms to understand this principle of overlapping crossings is to exaggerate the overlap. To practice these crossings with maximum overlap, we could notate them in the following way:

In performance, we would be unlikely to make this effect so pronounced but if we were to exactly notate a less overlapped version, it would look almost insanely complex so we are better off just dosifying our overlap according to our ears rather than trying to read or notate it.

The following link opens a version of the Prelude from Bach’s First Suite that is designed (bowed and fingered) as a study for these overlapping string crossings. Each possibility for overlap is indicated in a green enclosure:
Bach: Prelude of First Suite as an “Overlapped Stringcrossing” Study
Even though this slurred pairing of notes was definitely not Bach’s conception and does not appear in any of the manuscript sources, the resonance effect of the blurred crossings is so pleasing that we have used this bowing very much in the cellofun edition of this Prelude.
Bach: Prelude of First Suite: Cellofun Performance Edition
There are very many other moments in the Bach Cello Suites when we can make use of this idea to give added resonance to our playing:
STRING-CROSSING TIMING: ANTICIPATION AS A PRACTICE TECHNIQUE
It is actually very healthy to deliberately practice getting to the new string just a tiny bit earlier than necessary. This is a little bit like discovering where the edges of a car are when we are learning to drive it: it is much healthier to brush up against something soft and harmless deliberately, than to learn where the edges are in a painful and expensive accident. This anticipation of the new string level not only teaches us exactly where the new string is but also gets us used to approaching the new string in the smoothest, gentlest, most gradual way (see below for more about this). This can feel anti-natural because normally our fear of getting to the new string too early (rushing) leads us to delay our change to the new string until the last possible moment, which makes our changes too fast and jerky.
In the above examples, we placed the doublestop on the “new” note (and string), by simply maintaining the previous note longer than written. But the opposite scenario is also interesting and potentially useful: we can also place the doublestop on the note before the crossing. Of course, in a musical situation, this would be unacceptable, as the note on the “new string” will sound before it is supposed to. This would be much more annoying and anti-musical than having the note on the “old string” continue on a little longer (overlapping with the note on the new string). So why on earth – and when – would we ever want to anticipate the sounding of the new string?
This is exclusively a practice tool. As a general rule, it’s preferable to prepare our bow level changes (string crossings) a little too early rather than a little too late. This means that it can be useful, as a practice method, to actually over-anticipate the crossing, putting the double-stop on the note preceding the string change. In this way, we will get into the habit of preparing the crossings early, of being as close as possible to the next string well before we actually need to cross over. This is part of the larger principle of Anticipation (or “preparation”). We can gradually make the doublestop later and later, and shorter and shorter, until ultimately we eliminate the audible anticipation, doing the crossing perfectly in rhythm. But by then, all sense of jerkiness or abruptness will have disappeared (hopefully!) thanks to our previous anticipatory work.

PRACTICE ANY ONE REPERTOIRE EXCERPT WITH MANY DIFFERENT BOWING STYLES
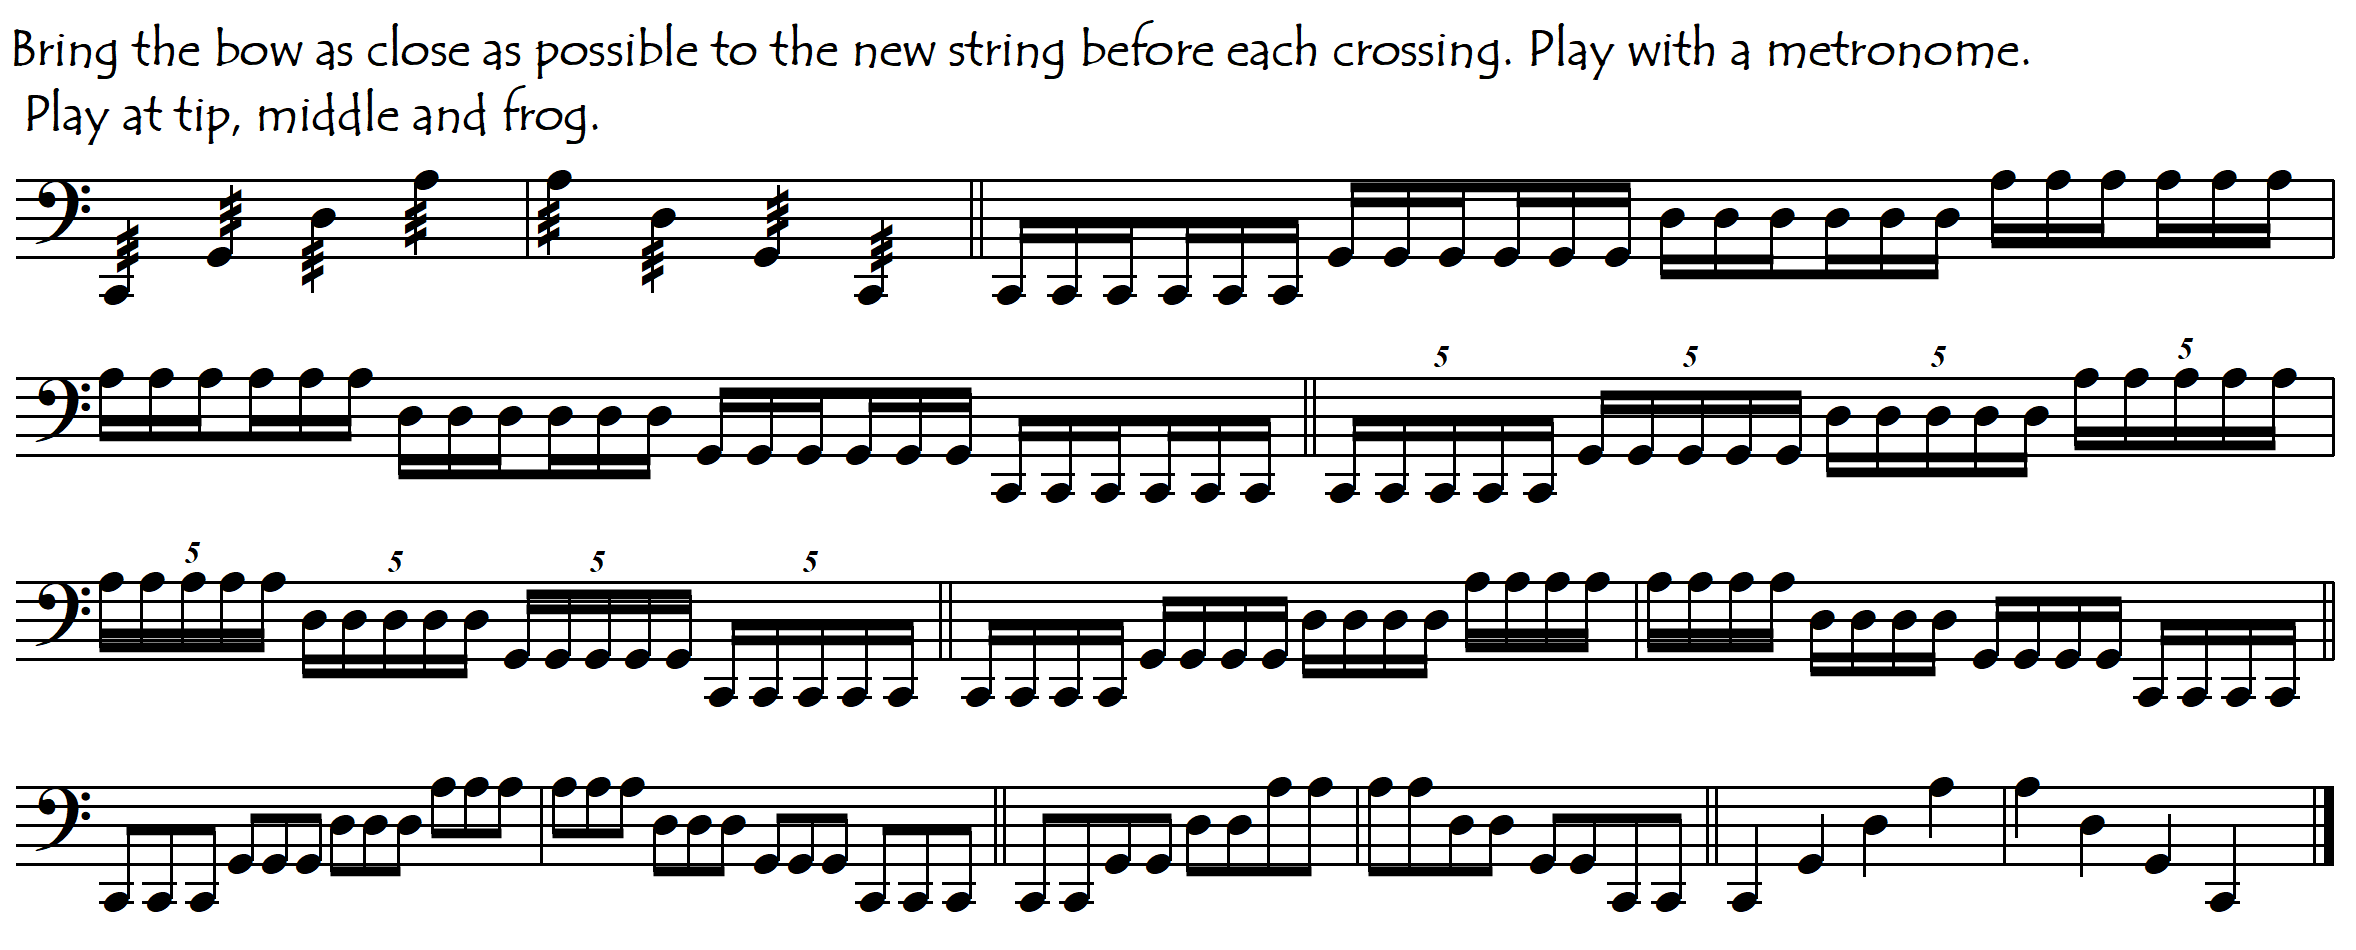
Many of our problematic string-crossing repertoire excerpts can be used as the basis for Sevcik-type exercises in which we practice them with different bowings and bowing styles (as well as with different rhythms) to develop all of our crossing skills:

This excerpt can be practiced with many bowing variants: start upbow and downbow ……… start at frog, tip or middle ……. play at different speeds ……. slur 2, 3, 4, 6, and 12 notes …….. play also with dotted rhythms ……. then do all the above variants but with separate (both on-string and spiccato) and mixed bowings.
ON SEPARATING LEFT-HAND PROBLEMS FROM RIGHT-HAND PROBLEMS IN STRING CROSSING PASSAGES
Playing rapidly across several strings creates not only bowing complications but also can cause specific and significant left-hand difficulties (see Left Hand String Crossings). Unfortunately, many exercises and studies that are supposedly intended for developing our “bow string-crossing skills” actually mix up too many of these left-hand problems with the right-hand string-crossing problems. The multiple volumes of Sevcik’s “School of Bowing Technique” dedicated to string crossings contain thousands of different rhythms, bowings, and articulations across 2, 3 and 4 strings. While these variations do provide excellent practice material for working on our string crossing technique, the chord sequences that these variations are applied to are not always the most well-chosen, mainly because they were simply transposed verbatim from his violin methods rather than being adapted to the cello. They are very nice-sounding harmonic progressions but they often involve too many left-hand complications which distract our attention from the bow. For example:

It can be more useful and efficient to work on the two hands separately, isolating them in the same way that pianists do. How can we do that?
ISOLATING RIGHT-HAND STRING CROSSINGS
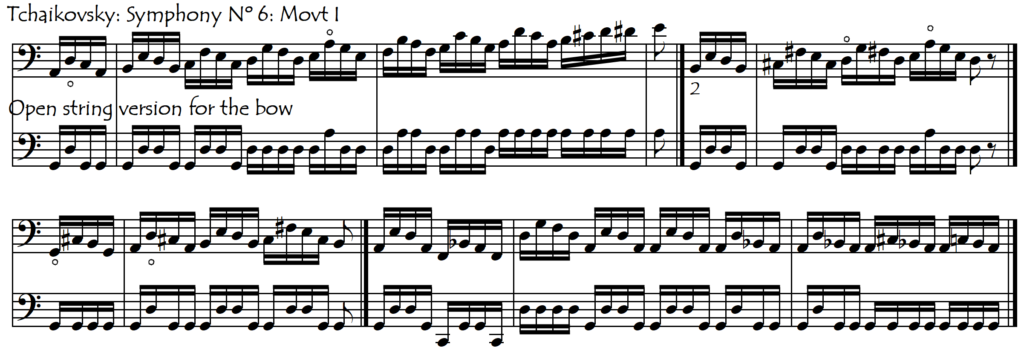
When we want to work on our bow string-crossing skills, it helps to simplify the left-hand’s participation as much as possible. Fortunately, this is quite easy. The ultimate simplification can be achieved by simply eliminating the left hand completely (playing the passage exclusively on open strings). This is a good way to start working on any problematic string-crossing passage. This allows us to concentrate our attention exclusively on the bow and is the most basic (and pure) level of string crossing exercise for the right hand. We can usefully convert even the most complex string-crossing passages from the musical repertoire into open-string exercises. Some of the most complicated passages may need to be written out in order to be able to be practised at speed.

Practicing string crossing exercises using only the open strings is, however, musical and psychological torture, so we want therefore to find some basic chord sequences which are easier for the left hand than Sevick’s, and at the same time more musically interesting than the “pure” (but mind-numbing) open string sequences. Let’s invent our own sequences then, in which we progressively add the left hand, one string at a time. Here are some suggestions in which the left hand is playing only ever on one string. Let’s start with the left hand moving only on the top string, as that is the easiest for both the hand and the brain:
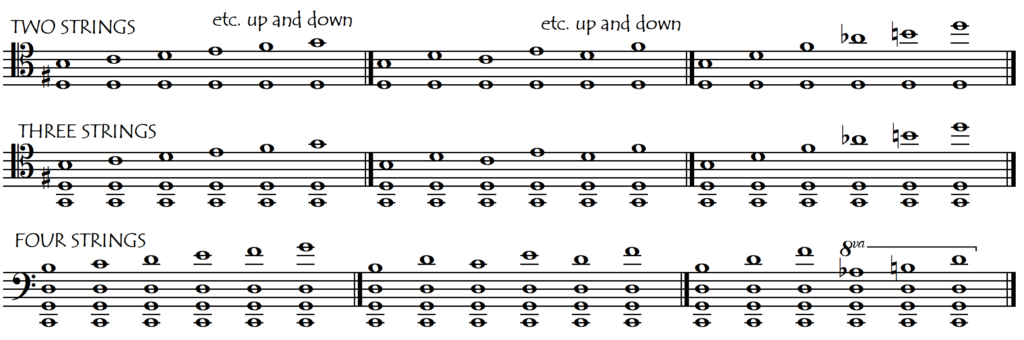
These patterns can go up ….. and come back down again. Nor do we need to use exclusively major scales – why not also the minor scales, and chromatic also. We can basically invent anything we like and thus choose our level of difficulty: ideally, just hard enough to stop us from getting bored, but not so difficult that it takes our attention away from the bow. In the above examples, we used the left hand only on the top string as this is the easiest both for our left hand and for our brain. We can of course also play with the left hand on a lower string. Here are some suggestions with the left hand playing only on the bottom string:
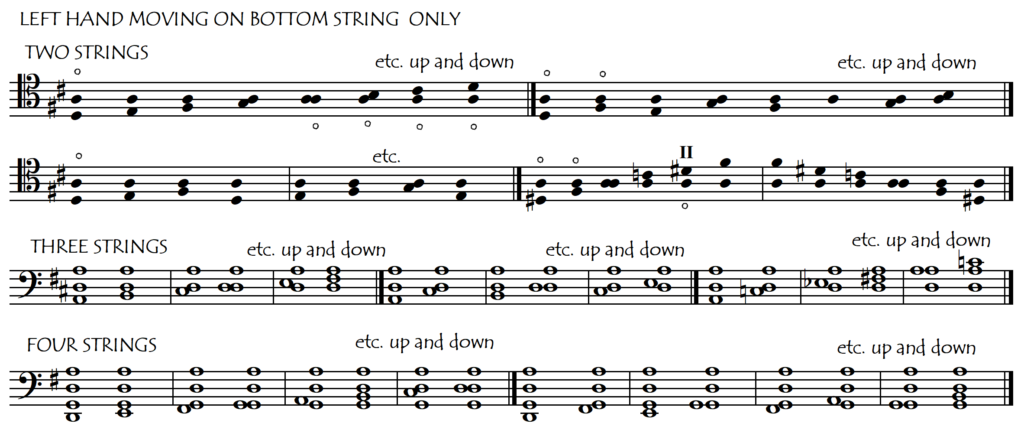
Playing with the left hand on a lower string while simultaneously using the higher open string(s) does however create several complications:
- we need to play very much on the tips of the fingers in order to not disturb the higher open string
- as we go up the fingerboard we start to play notes that sound higher than the next open string. This is like doing handwriting backwards or looking at the world upside-down (or through a distorting mirror) and requires a certain amount of mental gymnastics in order not to get confused. This is why we call these passages Upside-down String Crossings
- if we continue up into the thumb region, we need to play with the thumb floating free in order to not disturb the higher open string(s)
The next level of difficulty would be to play with the left hand on two strings instead of only on one, for example:

ISOLATING LEFT-HAND STRING CROSSINGS
In order to isolate the left-hand string-crossing problems, we can eliminate the bow completely by playing the passage pizzicato, which will, in the case of string-crossing passages often involve guitar-type strumming. Or, in the case of a passage involving only two strings, we can practice the passage as pure double stops (keeping the bow always on both strings at the same time). See the Left-Hand String Crossings page dedicated to the subject of the specific (and significant) left-hand difficulties associated with changing strings.
ON THE DANGERS OF CONCENTRATING EXCLUSIVELY ON VOCAL MELODIC MUSIC
If, like so many cellists, our favourite music is lyrical, singing melodies, then we may run the risk of not actually working sufficiently on string-crossing skills. We can see this clearly when we improvise, rarely creating (fooling around with) string crossing passages, as these require a harmonic sense, which is often much less developed than our melodic sense. This passion for melody can lead us to concentrate our energies on melodic virtuosity (very much a left-hand skill) to the detriment of string crossing virtuosity (almost exclusively a right-hand skill).
CONCLUSION
The variety of possible combinations of string crossings with different rhythms and bow articulations is enormous (look at the thousands in the Sevcik String Crossing Exercise books) but we don’t need to try to “do them all” systematically. Rather we can copy Sevcik’s idea and simply create exercises, in the moment, specifically from (and for) those repertoire passages that are giving us problems. Real music is the greatest source of unending and unimaginable combinations in which technical difficulties (in this case string crossing factors) are combined with other “problems” such as shifts, extensions (contortions) and “music” (dynamics, bow articulations etc.).