
The Right Wrist: Whips, Motors, Flicks, Flaps, Loops and Glue
Although we talk a lot about the wrist in the articles dedicated to Bow Changes, Bow Trajectory and Bow Hold, the wrist deserves its own special page because this complex articulation connecting the hand to the arm, is like a magic key that unlocks the door to the wonderful world of right-arm (bow) flexibility and fluidity.
The wrist joint is very complex, as anyone who has ever broken their wrist will know (there are 8 bones in there). It is the most complicated joint in the human body. So why does it have so many bones? Why is it so complicated ? It is all these things in order to allow the enormous flexibility that the human hand needs to operate our sophisticated tools (of which the bow is perhaps the most ultra-sophisticated). The eight little bones of the wrist allow the hand to move in every direction independently of the arm: we can move the hand up (flexion) … down (extension) … to the left … to the right … and also we can combine these directions to make circular movements in both clockwise and anticlockwise directions. In this sense, the wrist is rather like the neck, except that the wrist – unlike the neck – doesn’t allow the hand to rotate independently from the arm.
This flexibility (fluidity) in our use of the right hand is one of the most important aspects of both musicality and a good cello technique. A stiff, wooden, right wrist makes it so much more difficult to play a string instrument well. Smooth bowstarts, stops, changes and crossings, together with a beautiful sound and delicate control of dynamics (and articulations), are just some of the treasures that unblocking our wrist can give us access to.
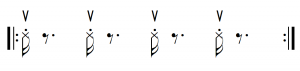
Here are some very simple basic exercise models that do wonders for freeing up the wrist. Improvise with these rhythms on any note sequences, but pay attention mostly to the wrist, which must move freely, amply and vigorously. The entire back and forth movement should be done by the wrist and fingers alone. The rest of the right arm should basically do nothing other than support the wrist (and change the arm level for the string crossings). We have given these movements some silly names:

In all the above rhythmic motifs, it is the downbow that has the energetic impulse, whereas the upbow is just the passive “bounce-back”. Here now are some examples in which the wrist movement in an upbow direction has the active, driving role.

And now for some exercises in which we use both the down and upbows wrist movement for giving the accented impulse:

Bowchanges, spiccato and string crossings all benefit greatly from a mobile, flexible and strong wrist. Along with the exercises shown above, another of the best ways to encourage – even oblige – our right wrist to develop these qualities is by practising material that uses spiccato and/or string crossings. And if we combine the three (bowchanges + spiccato + string crossing) in our practice material, then we will be giving the wrist a triply efficient workout!!
THE UTILITY OF A WRIST FLEXION/EXTENSION COMPONENT IN BOWING: THE “FLAP”
“Flexion/extension” is another way of describing the up-down movement that we make with the hand when our palm and forearm are parallel to the ground. In the above exercises, we looked at wrist flexibility in rapid changes on the same string. These use mainly the wrist movements in the “left/right” (horizontal) axis. But vertical movements of the hand are also a very important component of wrist flexibility. This is most obvious in rapid oscillating string crossings, for which the vertical movement of the hand is much more ergonomically efficient than movements of the whole arm:

THE FLEXION/EXTENSION WRIST MOVEMENT IN BOW CHANGES
While the vertical wrist movement is clearly useful (necessary) in these types of string crossings, it can also be, surprisingly, a very useful component of bowchanges on the same string. But how can we incorporate this vertical movement into a bowchange on the same string, that goes horizontally along the left/right axis? By simply rotating (turning) the hand slightly in an anti-clockwise direction (called pronation) on the bow, we allow the inclusion of this magical “floppy wrist” flexibility axis into our bow changes (and into our bowstroke in general). If we don’t do this “pronation” then the flexion/extension movement of the wrist is at 90º to the upbow/downbow axis, which means that it is no use at all in our bow changes.
This point is so important that it deserves to be explained twice for maximum clarity, so, in other words now, the problem caused by keeping the wrist flat (the hand un-pronated on the bow), is that it eliminates the possibility of using the “up-down” flexibility of the hand at the wrist (the floppy-wrist syndrome) for anything other than string crossings. With the wrist “flat” during a normal bow change, we are limited to using the “left-right” flexibility of the wrist. This is a shame because the wrist is so much more flexible in the up-down (flexion-extension) axis than in the left-right axis.
Surprisingly, even tremolo can often benefit from the incorporation of this vertical wrist component into the standard “left/right” movement axis. The flexion/extension movement is so natural and effortless that its use in long tremolo passages makes them significantly less strain for the right hand and arm.
But it is not only bow changes and oscillating string crossings that benefit from this use of the flexion/extension wrist movement: almost all aspects of our bowing technique can be helped by this little postural trick. Let’s look now at the ways in which this same wrist movement helps other aspects of our bowing technique:
UTILITY OF WRIST FLEXION/EXTENSION IN OUR BASIC BOW TRAJECTORY
Adding a little bit of this flexion/extension movement of the wrist, combined with its pronation, adds a whole new world (well, one more axis, to be exact) of movement and flexibility to our basic bow trajectory. It does this mainly by acting as a facilitator, a fluidifier, for whatever will happen at the end of the bowstroke. Any bow stroke ends in one of three ways, only one of which is a bowchange:
- we take the bow off the string
- we relax the pressure and leave it hovering (floating) weightlessly on the string, awaiting a new bowstroke
- we change the bow’s direction
We have talked already about how the wrist flexion/extension can help bow changes, but this same movement actually helps with the other two end-of-bow events also. So let’s remind ourselves again just what are these helpful movements:
1. allowing the wrist to rise up during the upbow (“flexion”), especially at the frog.
2. allowing the wrist to do the exact opposite (i.e. collapse, or, in anatomical terms “go into extension”) when we are at the tip of the bow, especially on the higher strings. This movement, apart from giving flexibility, also removes a lot of tension from the hand when playing at the tip of the bow.
UTILITY OF WRIST FLEXION/EXTENSION IN BOW STARTS AND FINISHES
When we start a gentle, slow downbow stroke, we can use this wrist movement as a “clutch” to give us a nice gentle fluid flowing start rather than an abrupt blast-off. If we have the wrist slightly flexed (raised) before we start moving the bow, then our arm movement can start at the wrist with the removal of this wrist flexion (in other words, we start the arm movement by flattening our wrist) before the bow actually starts moving. In this way we can start our note rather like a singer – in a very natural, beautiful way in which the moment in which the sound actually begins is almost imperceptible. Singers start to expel air before their note begins to sound. With this little wrist trick, we can do the string-players equivalent: starting to move our arm before our bow begins to move.
This same wrist movement – but in reverse – greatly facilitates the difficult bow technique of gentle note-finishes on an upbow in which we want to finish ppp and lift our bow smoothly off the string. Here, it is the ending of the note which can be made beautifully imperceptible, thanks to the continuation of the wrist flexion as we diminuendo and lift the bow off the string.
UTILITY OF WRIST FLEXION/EXTENSION IN FLYING UPBEATS: LOADING THE SPRING
Try the following little exercise, loudly and energetically. The bow movement is made only with the wrist and hand. There is as much time between the notes as we need to be absolutely comfortable:
In order to play these flying upbeats (not to be confused with flying upbow staccato nor spiccato) with energy, vigour and freedom of movement, we need to “load the spring” before we play each note, so that the energy is released in a sudden and short impulse. The effect of this sudden release of high energy is like a gunshot, a catapult, a mousetrap etc. If we incorporate our flexion/extension wrist movement axis into this spring-loading then we can achieve these energetic flying upbeats much better than if we were only to use our left/right wrist axis. Loading the spring is done therefore by putting the wrist into considerable flexion (as well as being displaced to the right) before we start the bow stroke. In each short bowstroke, this flexion is suddenly released and the wrist goes into extension. Exaggerating both the amount of flexion before the bowstroke and the amount of extension after the bowstroke, is a good way to encourage the wrist to be free, energetic and expressive.
We can also try this exercise with all downbows to experiment with how we “load the spring” for the short downbow explosions. Do we do this in the exact opposite way – by starting in extreme extension and with the wrist displaced to the left?
MISCELLANEOUS POINTS TO DO WITH WRIST FLEXION/EXTENSION
- when we raise the wrist at the frog, the fingers/hand can actually point slightly more to the right (away from the body), whereas at the tip of the bow, when we “collapse” the wrist, the fingers/hand can point slightly towards the left.
- at the frog, if we raise the wrist slightly, the hand can “hang ” a little from the wrist – especially in soft playing.
- when we are coming in towards the frog on the up-bow on the C-string, we may find our wrist colliding with the corner of the cello’s body. This is because the ergonomically comfortable “flat” wrist that most cellists (unlike violinists) tend to favour in the upper half of the bow, just doesn’t give our hand enough clearance to pass over the obstacle of the protruding point at the cello’s “waist”. This problem only occurs on the C-string and is at its worst in soft playing (because the point of contact of the bow is further over the fingerboard). To avoid this problem, when coming in towards the frog on an up-bow, we may need to use a higher (more arched) wrist on the C-string than on the other strings. To get used to this “unnatural” posture, we could practice the exercises given at the top of this page, but always on the C-string, and always exactly in that part of the bow where our hand is closest to hitting the side of the cello.
COMBINATION OF VERTICAL AND HORIZONTAL WRIST MOVEMENTS = LOOPS
The combination of “flexion-extension” movements of the wrist with the “left-right” movements of wrist and fingers, produces “loops”: circular or elliptical shapes. These loops are made by the right hand most clearly in the transformation period at the end of each bowstroke when we either remove the bow from the string or start a new bowstroke. We have only two possible loop directions – clockwise or anti-clockwise – and normally our favourite loop direction with the bowhand (for unknown anatomical reasons) is clockwise, rather than anti-clockwise. Certainly, in the above example, the upbow “flicks” undoubtedly make clockwise loops. Try now the same exercise but with all the notes on downbows. Are our loops clockwise or anticlockwise?
The clockwise wrist loop definitely favours spiccato and string crossings, while anti-clockwise loops strongly inhibit the bow’s bounce. We really need to be aware of this so that we can choose our wrist-loop direction according to the effect we want to achieve: trying to do spiccato with anti-clockwise wrist loops is destined to failure, whereas a nice smooth on-the-string tremolo will be greatly favoured by this loop direction (see Spiccato and String Crossings).
HOW TO ENCOURAGE A STIFF WRIST TO LOOSEN UP
Wrists, like the people they are attached to, are creatures of habit, and it is very difficult to break old habits. What’s more, the ways in which we move our wrists and hands are a powerful means of body language communication in daily life, reflecting deeply both our personality and our cultural roots. Just think about how Italians accompany their talking with their ultra-mobile and expressive hands (no doubt one of the reasons for the prevalence of Italian conductors). Think also about how effeminacy is so strongly associated with a floppy wrist: anybody who has ever shaken hands with a traditional Kiwi, Australian or South African farmer-type will have no doubt about what the firm, unyielding wrist and grip is saying! All this is simply to remind us just how deeply ingrained (and therefore difficult to change) our style of wrist choreography is, both at and away from the cello. Imagine trying to reeducate the colonial macho-type to gesticulate like an Italian when talking …… !
So how can we re-educate our wrist at the cello? The most fundamental ingredient required for wrist re-education is simply attention, which means basically visual attention. And for this to work, we need first of all to make sure we can easily and unobstructedly see the right wrist, which means don’t wear long sleeves when practising! We can also start by removing our watch, if we have it on our right wrist. This will help for several reasons:
- firstly, because the watch and strap (especially if they are in the big wide heavy macho style), obscure our vision of the wrist and may even have a mild “strapping” effect
- but also, from a psychological point of view, because the sudden radical change associated with the disappearance of the watch and the new associated lightness of the hand will make us more aware of that part of our anatomy, which will suddenly feel “naked” and exposed. This feeling that something special and different is happening at the wrist will help us to concentrate our attention there and to break the old movement (or more accurately “lack-of-movement”) habits.
While the visual observation of our right hand is the start of its re-education, this “wrist-watching” is unfortunately not as easy as it sounds. When we concentrate our visual attention on our physical movements at the cello we tend to focus exclusively on either the left hand or on the point of contact of the bow at the string. We limit our visual attention to those two objectives probably because they, unlike the right hand, are always present in our frame of vision. By contrast, if we try to observe exclusively our right hand we will soon realise that this requires considerably more effort because it (the hand) moves such large distances that in order to follow it with our eyes we need to move our head constantly and also refocus continually our vision on this “rapidly moving target”. One curious way in which we can eliminate this inconvenience and thus make the observation of our right wrist easier while playing, is to watch it in a reflection (in a mirror, or in a window at night). The fact that we are a few metres distant from the image of the hand means that now its entire range of movement stays within our visual range, thus eliminating the need for us to constantly “chase it” with our eyes. And of course, in order to be able to watch our right-hand, we will need to be playing from memory (or improvising) because if our eyes are glued to a music stand then we obviously cannot be simultaneously watching our wrist.
Watching video recordings of our playing also makes the observation of our right wrist hand easy, however this is exclusively a (very useful) diagnostic tool rather than a means to re-education.
Apart from watching our wrist while we play, two other fundamentally useful concepts for loosening up a tight wrist are:
- we need to accept that we can’t allow the wrist to “be natural”. If we do this – just “letting it be” – then nothing will change and it will just continue as always. Trying to “relax it” is also very inefficient: we will need to be much more active, deliberately forcing it out of its comfort zone, which requires considerable effort
- as with all retraining, exaggerating the amplitude of the new movements at the beginning is a useful way to make the difference between the old way and the new way clearer and thus to help break the old habits.
Here is a link to several pages of “wrist-workout” exercises in which we work on each of the different possible wrist movements in isolation. Improvise with the different rhythmic motifs on any note sequences, but pay attention mostly to the wrist, which must move freely, amply and vigorously. The entire back and forth movement should be done by the wrist and fingers alone. The rest of the right arm should basically do nothing other than support the wrist (and change the arm level for the string crossings). :
Wrist Mobility Workout Exercises
CONCLUSION
Adding wrist flexibility and freedom to our bow technique is like adding oil to dried up machinery, putting a cushion onto a hard surface or carpet on a hard floor. In fact, wrist mobility is probably almost as important for our right-hand expressivity as vibrato is for our left-hand expressivity. Both the horizontal and vertical wrist movements are important but wrist movement in a left/right axis (upbow and downbow axis) seems to be more natural and intuitive (for example spiccato, tremolo, ostinato) than the movement in the vertical axis (flexion and extension) so we may have to work more on these vertical movements. It is above all with these vertical movements of flexion and extension that our bow arm becomes a dancer rather than a backwards-and-forwards machine.
It took me a long time to realise this as my main cello teachers had all advised me: “keep your right wrist flat” (on any one string). The flat wrist worked for them, and it certainly worked for Tortelier also ………. but it caused me general bowing stiffness, inhibition, mechanicalness and discomfort, all of which amplified to a catastrophic blockage on the upbow! Perhaps these teachers – all male and muscular – were afraid of the floppy wrist? I have never seen this rigidity – neither of wrist nor of mind – in women cellists!!