
Fifths On The Cello
Fifths (across strings) are often a significant source of problems for cellists. On the violin and viola, one fingertip can cover (stop) two strings at the same time and thus fifths across two strings can be played very easily. On the cello, however, the fingertips are too small to stop two strings at the same time. This means that to play a fifth with one finger we need to change our finger-and-hand posture, flattening the finger completely and pressing the entire last phalanx horizontally across the two strings. Small-handed cellists will probably find that, for all of the fingers apart from the thumb, this position is only really practical in the Neck Region of the fingerboard.
Fifths are one of the most basic building blocks of the musical language and, along with thirds, sixths and octaves, are one of the most frequently-used intervals in tonal music. Curiously – unfortunately even – of these absolutely basic intervals played across two strings, only the sixths and the major-thirds are “easy” on the cello. Octaves, fifths, and minor thirds (simple extensions when played across two strings) all present us with ergonomic problems.
Fifths are everywhere, but it is probably in our chordal playing that we will face the greatest concentration of them:

Even if, as is often the case, our lefthand chords and double-stops are “broken” by the right hand, the lefthand will often need to stop the two strings of the fifth at the same time in exactly the same way as if they were sustained doublestops.

UN-PARALLEL FIFTHS
When we study harmony we quickly learn of the dangers of “parallel fifths”. On the cello however, unlike for harmony, we would greatly benefit if the fifths were a bit more parallel because they are in fact usually surprisingly unparallel. Science would suppose that, if the strings were tuned accurately, then each note of a double-stopped fifth should be exactly at the same distance from the “nut” (at the scroll-end [top] of the fingerboard). Surprisingly this is not so. The hand has to twist and turn in order to find the correct angle for the finger that is stopping a fifth in order for that fifth to sound in tune. What’s more, this angle changes according to which pair of strings we are using, and not just by small amounts. Whereas for fifths across the A and D strings the “in-tune-fifth-angle” tends to be with the fingertip pointing towards the scroll, on the D and G strings the correct angle seems to be pointing in the opposite direction. And on the G and C strings, it would appear again to require the same angle as for the top two strings.

To confirm which finger angle is required on each of the different pairs of strings try the following little exercise (on each of the three pairs of strings):

The finger angle necessary to play an in-tune fifth across the two top strings and across the two bottom strings could be justified by the difference in “hardness” between the parts of the finger (or thumb) that are stopping the two strings. That part of the finger that is stopping the higher string finger is usually much softer and less resistant than the end of the finger which is stopping the lower string. This means that the higher string is often not sufficiently firmly stopped to sound “true” and may tend to sound flat. While this might explain those fifths for which the finger needs to point “backwards” (towards the scroll), what about fifths across the D and G strings, for which the hand needs to point the other way?
There must be a good explanation for this, but I haven’t yet heard it. Does this phenomenon only happen on fifths or are all the notes/intervals across each pair of strings equally affected? This phenomenon is so bizarre that it resembles the bending of space, time, and gravity that Einstein discovered. Perhaps he could have explained the reasons for these “crooked fifths”, I certainly can’t!
A radical (and untried) possible solution would be for the bridge to have a narrow “ledge” protruding towards the fingerboard just at the places where the A and G strings pass over it. This ledge would have the effect of shortening those strings’ length relative to that of the D and C strings, meaning that every note on the A and G strings would now need to be stopped a tiny bit further towards the nut of the fingerboard, effectively making our fifths across the four strings perfectly parallel. This would have specially advantageous consequences for fifths on the thumb, for which the un-parallel fifth across the top two strings causes us some severe ergonomic problems.
ERGONOMIC PROBLEMS IN THUMBPOSITION CAUSED BY UNPARALLEL FIFTHS
In thumbposition, the angle of the thumb required for an in-tune fifth across the A and D strings poses serious problems for our hand’s ergonomy. If the tip of the thumb could be pointing the other way (towards the bridge instead of towards the scroll) then this would constitute a great help for our hand. With the thumb pointing towards the scroll however, the fingers (especially the lower ones and especially on the higher string) are obliged to curl up into an even more uncomfortable posture, which supposes a great hindrance to all aspects of our left-hand technique. With the great majority of our thumbposition playing occurring on our top two strings, this “unergonomic” fifth angle across those two strings seems like a very unfortunate act of nature/physics.
ON ONE STRING OR ACROSS TWO STRINGS?
If our fifth is not actually a doublestop then we can of course sometimes eliminate all these difficulties by shifting the interval on the same string or, in the higher regions, by stretching it (especially from/to the thumb.

In this article however, we will be looking specifically and uniquely at the techniques of playing fifths “across the strings”. Let’s look now at the five (I promise this “5” is a pure coincidence) different ways in which we can choreograph fifths across the strings in such a way as to make them both musically satisfying and technically easy.
FIVE TECHNIQUES FOR PLAYING FIFTHS ACROSS THE STRINGS
1. SLITHER OR JUMP: MOVING THE SAME FINGER FROM ONE STRING TO THE NEXT
If our fifth interval is neither slurred, doublestopped, nor very fast, then we will probably have time to move the same finger across to the new string.
In the game “Snakes and Ladders” – and in almost all aspects of life – it is normally easier to go down than it is to go up: we slide (or fall) down quickly and then we climb up again slowly and laboriously. However, with fifths, this reality is inverted. If our fifth is down to the lower string, we will need to jump the finger across, but if the fifth is up to the higher string then we can simply slide it across, which is a much simpler, easier movement than the jump. In fact, the “slither” across to the higher string is so natural and easy that we can do it even in a slurred fifth (see the third enclosure in the following example). In the following repertoire excerpts, the “jump fifths” (to the lower string) are indicated by red enclosures while the “slither fifths” (to the higher string) are within the green enclosures.
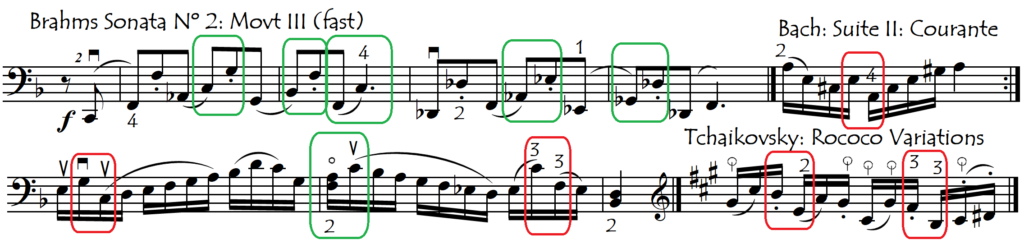
Here below is a compilation of passages from the repertoire for which we will probably use the “jump” or “slither” fifth technique:
Jumping (or Slithering) Fiths: REPERTOIRE EXCERPTS
Moving the same finger across to the neighbouring string is the most simple, easy, and straightforward technique for doing fifths, but we can’t do doublestopped fifths like this, nor can we make slurred legato fifths down to the lower string like this. And, in faster music, even when the fifth is neither doublestopped nor slurred downwards, the need to move the same finger from one string to the other can pose an ergonomic problem. Certainly, for downward fifths, we often just don’t have enough time between the notes to comfortably lift the finger, jump it to the other string and then rearticulate it on the new string. Therefore, in those three circumstances (doublestopped, slurred downwards or awkward), we may want (or need) to use other, more sophisticated techniques to achieve our fifths. These four alternative techniques are:
2. PLACING (STOPPING) ONE FINGER ON BOTH STRINGS AT THE SAME TIME: THE “CAPO” FIFTH
Unlike violinists, we cellists can’t stop two strings simultaneously with one fingertip. In order to stop two strings at the same time with the same finger, we need to flatten the finger completely and press the entire last phalanx (the entire finger pad), rigid and straightened out like a bar (or like a piece of wood), across both strings, like a guitar “capo”. This is why we will call this technique the “capo” fifth.

USE OF “CAPO FIFTH” EVEN WITHOUT A FIFTH
Sometimes we will even use this “capo fifth” technique to avoid jumping the finger back and forth across the strings even when there is no fifth being played (see Left-Hand String Crosssings):

The “capo fifth” is a huge topic and therefore has its own dedicated page:
With the first finger and in the Neck Region, capo fifths are normally quite unproblematic. But in many other situations, and especially on the higher fingers and in the higher positions, capo fifths can present us with serious complications (difficulties). For this reason, we will often, especially if we have a small hand, need (or choose) to use some of the other more sophisticated and complex alternative fingering techniques for playing our fifths, such as:
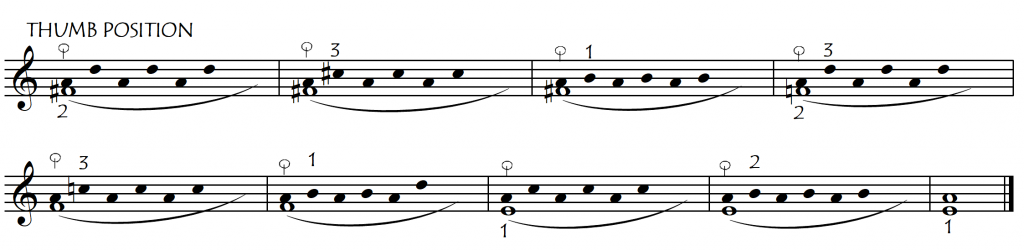
3. USING THUMBPOSITION: PLAYING OUR CAPO FIFTH ON THE THUMB
The thumb is the ideal finger for doing “capo” fifths for two reasons.
- its natural angle is at 90º to the strings, and
- the part of it that stops the strings is of equal “hardness” for both strings (assuming of course that we have a good callous).
The thumb is especially useful for playing fifths in the higher (Intermediate and Thumb) regions as it is in these higher regions that it is both very difficult to do the capo with the fingers, and very easy to use the thumb in general. But the thumb is quite often useful also for fifths in the Neck Region, especially in pianistic-style accompaniment passages that don’t need a lot of vibrato. This type of writing is very common in compositions of the Classical Period, but even in the Romantic Period it is also widely used in accompaniment figures. Very often it is the presence of fifths in a passage that will be the principal factor in our decision to use the thumbposition in the Neck Region:

Note that if we don’t have a good callous on the side of the thumb, then the top note of the fifth (the higher string) will require greater thumb pressure in order to be stopped cleanly and thus not sound flat (below pitch). This adds unnecessary tension, effort and difficulty to our playing. To avoid that, we will need to keep a good callous by using the thumb regularly.
4. SHIFTING TO A NEW FINGER ON THE NEW STRING (FINGER SUBSTITUTION)
If our fifth is broken (not a sustained doublestop) then we have the possibility of doing a finger substitution to the adjacent string instead of playing a capo fifth. Here the whole hand (and arm) actually changes position and the “old” finger is released during the shift to the new string. Let’s look first at the smallest, easiest, most convenient shift-fifths: those where we change to a neighbouring finger, which means that the hand moves only one semitone:

This technique is especially useful for playing slurred doublestopped progressions in which our broken fifths are “hidden” in the sense that they occur between two different voices. If we don’t shift, and simply jump the finger across the strings for the fifth(s), then it will be impossible to play our phrase legato. Here are two repertoire excerpts illustrating this situation, followed by a little exercise:
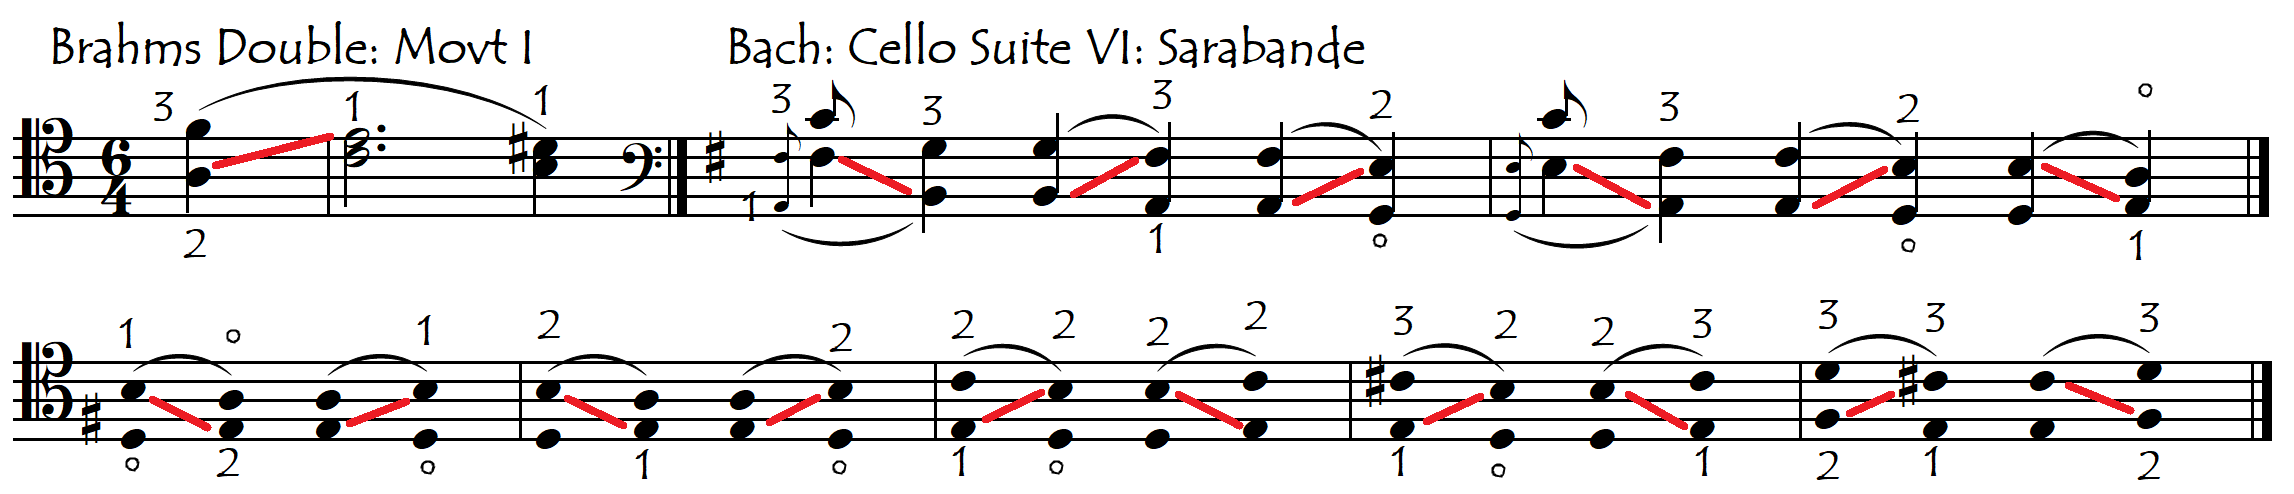
The shift-fifth doesn’t necessarily have to be a semitone shift to a neighbouring finger: we can also play the other note of the fifth on a more distant finger, using a shift of a tone or minor third:

Here are some links to study material for working on this skill:
Shifting Across The Strings For Broken Fifths: EXERCISES
Shifting Across The Strings For Broken Fifths: REPERTOIRE EXCERPTS
5. HAND WARP (CONTORTION) WITH FINGER SQUEEZE ACROSS STRINGS
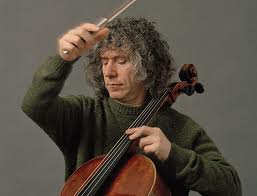 In “squeezed” fifths we twist the left hand, turning it so the fingertips are now pointing towards the bridge (see photo). This allows us to play fifths with two different adjacent fingers and gives us (sometimes) a solution for fifths for which neither a “capo” nor a finger jump across the strings are viable possibilities. It also allows us to do a real vibrato on the fifth, which is especially important in lyrical passages.
Because of the form (anatomy) of the hand and arm, this twisted posture is normally only practical when we place the higher finger on the higher string and the lower finger on the lower string (and not vice versa).
This is made easier for us on the top (A/D) and bottom (G/C) pairs of strings because on those strings, the unparallel nature of the fifths makes our “squeeze” easier (smaller). For fifths across the D and G strings however, the squeeze size needs to be a little bigger (more contorted) in order to compensate for the unfavourable angle of the unparallel fifth.

The “squeezed fifth”, unlike the “shifted fifth” (see the previous paragraph) is a contortion to a neighbouring string rather than a shift to the neighbouring string. Sometimes however this contortion is followed immediately by the relaxation of the hand into the new position (one semitone away from the old position), giving us a one-semitone snakecrawl shift (see “Contractions“).

At other times the “old” finger is maintained stopped during the entire duration of the fifth and the hand returns to (stays in) that same original “position” after the squeezed fifth (in other words, there is no shift).

The smaller the hand and fingers, the more we will tend to use the “squeeze fifth” technique. This is not only because the squeeze fifth requires less brute force (strength) from the fingers than the “capo fifth” but also because small fingers actually fit “across” the fingerboard whereas big wide “sausage” fingers might not. Therefore, cellists with small fingers may find it easier to use the “two-finger-squeeze” for fifths for which cellists with large fingers may be quite happy to use just the one finger, squashed flat (capo) across the two strings. And it is to avoid capo fifths on the smallest, weakest fingers that we will be most likely use the squeeze fifth. The fourth finger capo fifth for a small hand is usually something to be avoided like the plague, and the third finger can often just twist in beside it on the lower string without too much effort.


In some passages in double-stops however, even the biggest, strongest hands are no solution and the squeeze”contortion” is really the only solution:

SQUEEZED FIFTHS IN THE HIGHER REGIONS
If we take these same passages and transpose them up into the Intermediate or Thumb Regions, we can see that we can use exactly the same “squeezed fifth” technique in the higher regions of the fingerboard.

Here below is a little exercise for squeezed-fifths in thumbposition.
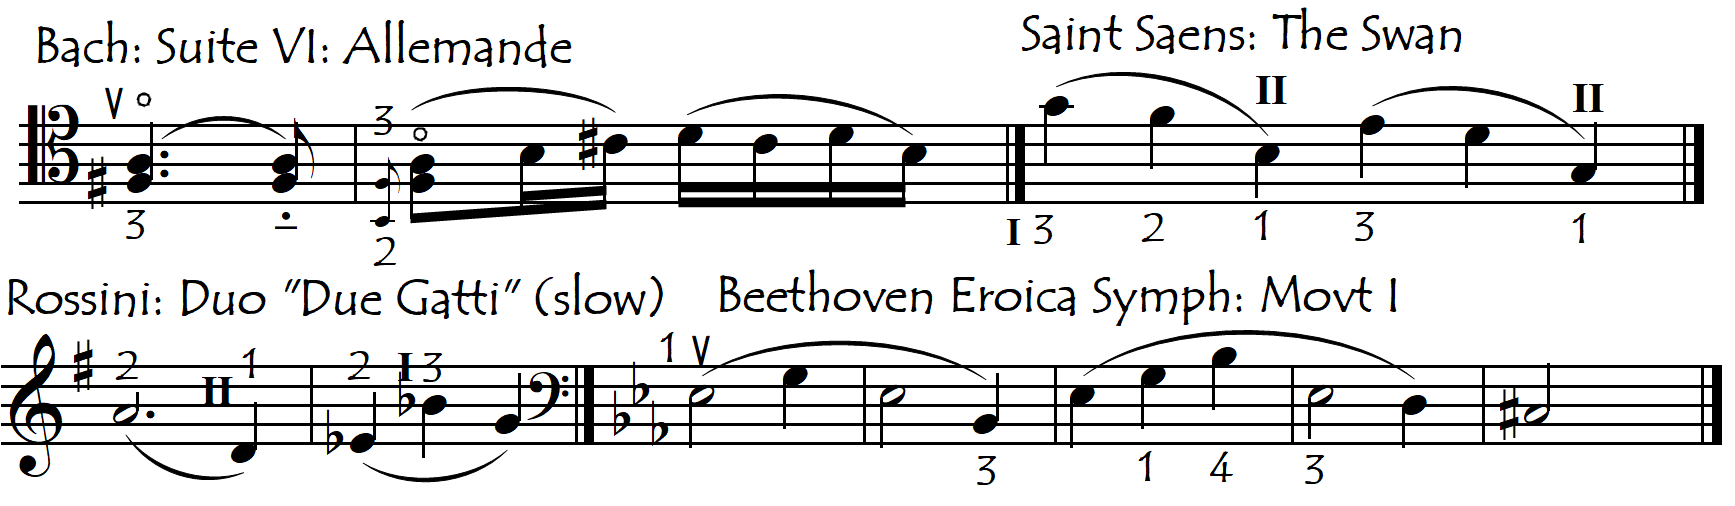
Once we get above the neck region, because the hand is now tipped back more (fingers pointing towards the bridge), it becomes increasingly difficult to use the flattened finger “capo fifths” posture but increasingly easy to use the “two-finger-squeeze” position (and, of course, the capo on the thumb). This is why the “squeeze-fifths” used six times in the following thumbposition excerpt from the Saint Saens Concerto, would probably be substituted by “capo-fifths” if the passage was transposed down into the Neck Region:


Here are some links to more practice material specialised in “squeezed fifths” in all the fingerboard regions:
Squeezed Fifths in All Regions: EXERCISES
Squeezed Fifths in Neck and Intermediate Regions: REPERTOIRE EXCERPTS
Squeezed Fifths in Thumbposition: REPERTOIRE EXCERPTS
CAPO FIFTHS ACROSS THREE STRINGS ? SQUEEZES AND REVERSE SQUEEZES
Sometimes our “capo fifth” finger would need to cross three strings, giving us a major ninth interval instead of a fifth (yes, it is curious that a fifth + a fifth = a ninth and not a tenth but this is the way musical intervals are named: a 2nd is one tone/semitone, a 3rd is two steps etc.). Trying to do a “capo” stop across three strings is something that requires such strength that only the largest, strongest hands can do it easily, and then only on the first finger in the neck region (and perhaps also the thumb). For a normal hand, we will normally either jump the finger over the middle string(s) or do a finger squeeze in order to be able to use different fingers on the two strings, as shown in the following exercises.

REVERSE SQUEEZES
The following examples illustrate an extremely rare curiosity in which the hand actually twists in the opposite direction, with the higher finger now on the lower string. We could call these “reverse squeezes” and might do them in order to be able to stay in the same position (avoid a shift) and/or because we have the first finger on the top string and no possibility to use a lower finger to squeeze up onto the lower string:

MIXED-CHOREOGRAPHY FIFTHS
In most musical passages, different “fifths techniques” will be used consecutively according to the specific musical and technical constraints. In the original Saint Saens extract, for example, we are using both “thumb-stopped-fifths” and “finger-squeezed-fifths”.