
Capo Fifths On The Cello
This is a sub-page of the article dedicated to playing Fifths on the cello.
Unlike violinists, we cellists can’t stop two strings simultaneously with one fingertip. In order to stop two strings at the same time with the same finger, we need to change our finger posture, flattening the finger completely and pressing the entire last phalanx (the entire finger pad), rigid and straightened out like a bar (or like a piece of wood), across both strings, like a guitar “capo”. This is why we will call this technique the “capo” fifth. The following finger configurations with capo fifths on each finger can be transposed around the Neck Region.

Because of the hand’s ergonomy and orientation, in the Intermediate Region of the fingerboard, capo fifths on the fingers are much more difficult than in the Neck Region. These problems are multiplied when we are using thumbposition. Depending on the strength and flexibility of our fingers, we may be able to play (hold down) capo fifths with the fingers in these higher fingerboard regions but as a general rule, it is the thumb that is the unchallenged hero of capo fifths anywhere above the Neck Region. The subject of capo fifths on the thumb is dealt with in the thumbposition section which means that this article is almost entirely dedicated to capo fifths in the Neck Region.
JUMP OR CAPO?
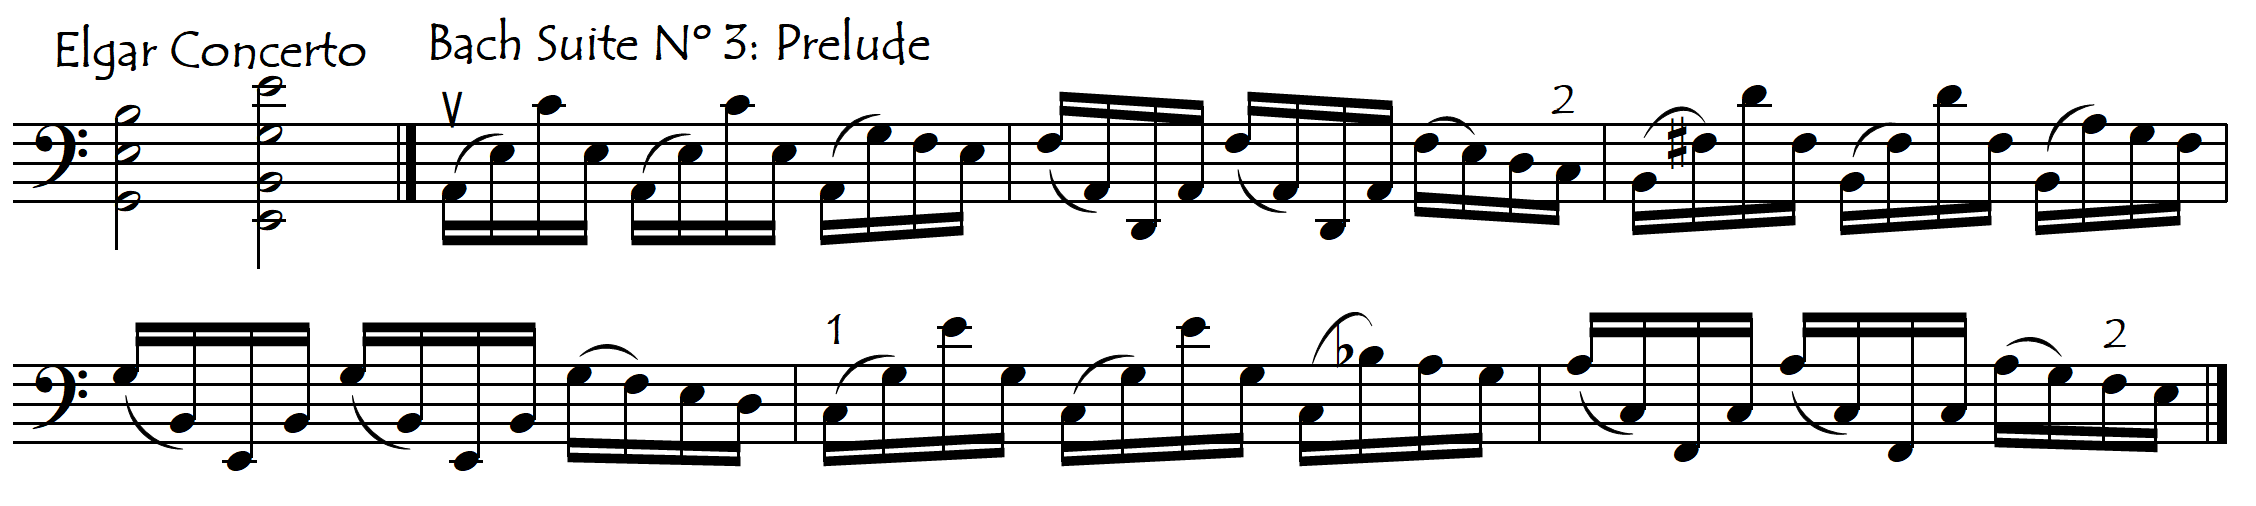
Sometimes, especially for the first finger, it is not absolutely clear whether it would be better to jump the finger across the strings or use the capo technique, as in the following examples:


In passages such as these, cellists with a larger, stronger hand will have a greater tendency to use the sustained capo fifth whereas the smaller-hand cellist might prefer to use their speed and agility (jumping the finger back and forth between the strings) to compensate for the lack of strength. The thumb, in any fingerboard region, avoids the need for finger-jumping.

CAPO FIFTHS FINGER PREFERENCE
“Capo” fifths are perfectly suited to being played by the thumb (see below and also the page dedicated to Fifths), but when we need to play them with the other fingers we will notice considerable differences in the ease (or difficulty) with which each different finger is able to stop two strings at the same time. The first finger is, after the thumb, by far the most suitable finger for playing capo fifths which is fortunate because a large part of the fifths we will need to play actually fall on the first finger:
We can even sometimes stop three strings at the same time with the first finger, something that with the other fingers is very unlikely except perhaps for the largest, strongest hands:

After the first finger, the other fingers become progressively weaker and less suited to playing capo fifths, with the little finger being the least suited.

The above examples are playable, but sometimes (often) we may want to refinger passages to avoid the capo fourth finger. How many cellists can play the following passages with the capo fourth finger ?


BROKEN CAPO-FIFTHS AND THEIR NEED FOR PREPARATION
Apart from being necessary for doublestopped and slurred fifths, the “capo” fifth is also useful for fast playing even when the two notes of the fifth are not slurred or doublestopped. This is because the capo fifth allows us to play the two notes of the fifth successively without any new left-hand movement (finger articulation). This of course requires advance preparation: when we place the finger, we will need to place it on both strings at once, as though we were playing a doublestop, even though we are only playing a single note. It may not be a doublestop for the bow but it certainly is for the left hand. The bracket symbol seen in the examples below is the sign that we can use to remind ourselves that we must place the finger on the two strings simultaneously, and keep it on the two strings for as long as the bracket is maintained.


FROM ABOVE OR FROM BELOW: THE PREPARATION DIFFERENCE
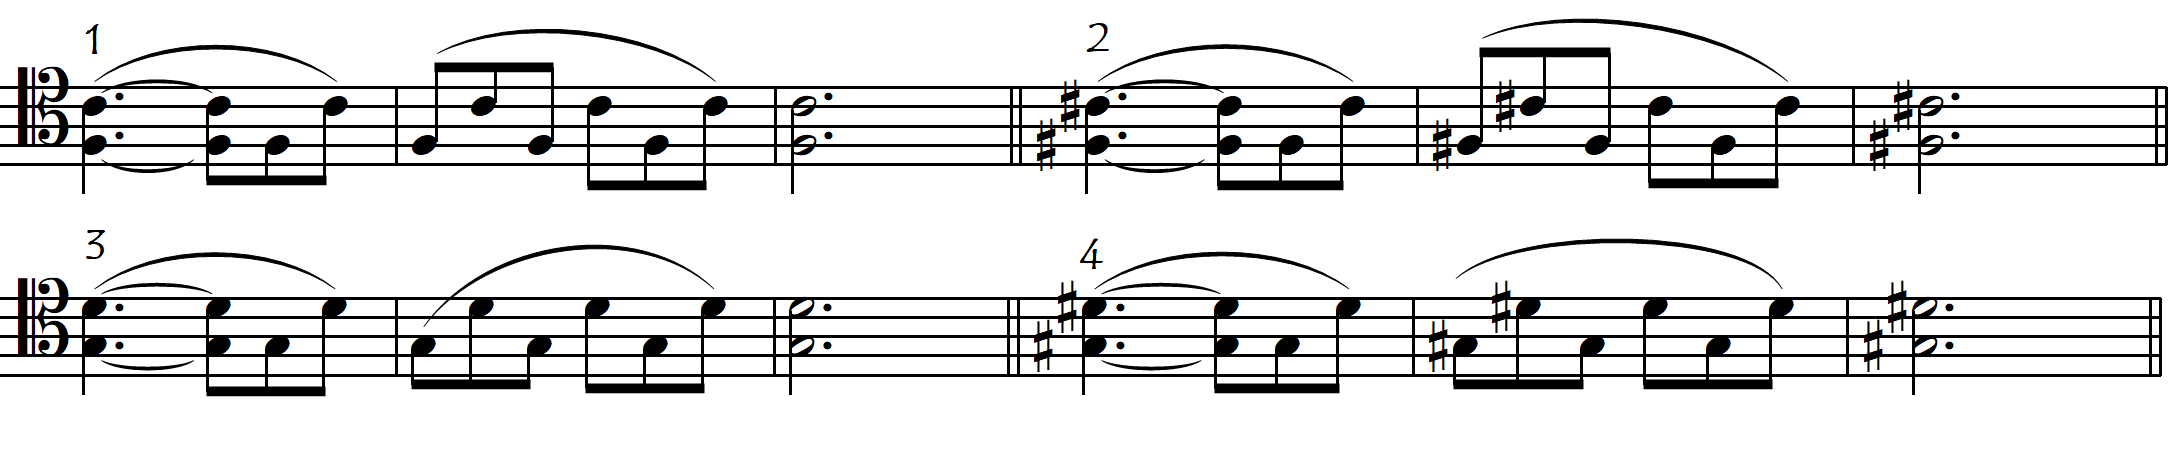
This preparation is especially necessary – and especially difficult (unnatural) – when the first note of the fifth is the higher note, as in the above examples. If the first note of the fifth is the lower note, even if we forget to place the finger across both strings we may still be able to just squash the finger flat on the higher string in time for the higher note. But this possibility does not exist when we are starting from the top note of the fifth. If we forget our need for the capo fifth on that higher note and start it with our normal finger posture then there is no escape: the only way now to stop the lower note of the fifth is to lift off the finger and rearticulate it. We can see this difference clearly in the excerpt below: the green rectangles indicate capo fifths that are stopped from below, while the red rectangles indicate those that are stopped from above.

Sometimes our capo fifth is not needed to actually play the interval of a fifth but rather to prepare the same finger on the neighbouring string for a shift up or down to another position with the same finger but on that new string. The following repertoire excerpts show some situations in which we do this with the first finger and shift always to the lower string:

But we can do this “capo-fifth-for-a-shift” on any of our fingers, and it can be for a shift to either the higher or lower string.

In the above examples, we can see clearly how the capo preparation is so much more unnatural when starting from the higher string (as compared to when starting from the lower string). In order to work on this particular skill, choose from the practice material offered below, those pages of broken capo fifths that start always “from above” (in other words, that start on the higher note of the fifth).
BROKE IS BETTER: GETTING OUT OF THE CAPO POSITION: THE “SECRET SLITHER”
The great advantage of broken capo fifths, compared to sustained doublestopped capo fifths, is that we don’t have to hold the capo fifth down for long. We will, in fact, normally do our best to get out of the unnatural, strained capo position as soon as we can. If our broken capo fifth started on the top note, then getting out of the capo position is not difficult: we only need to release the capo finger pressure on the top string and we are back to our normal, comfortable, non-capo finger position:

If however, our broken capo fifth goes across to the higher note (string), then our escape from the capo position will need to be a little more conscious. To not disturb the higher note we will need to do a “secret slither”, sliding the finger imperceptibly off the bottom string once the higher string note is sounding. In this way, the second note of the fifth can be played with the normal, more comfortable, non-capo finger posture. The need to release the capo and bring the finger pad over from the lower string becomes more important with the higher, weaker fingers. While we may not necessarily need to do it for the first finger, we almost certainly will for the fourth finger:

THE USE OF THE “SECRET SLITHER” WHEN SHIFTING ON A BROKEN CAPO FIFTH
To make a legato (slurred) same-finger-shift to a neighbouring string, we will need to start with a capo fifth. Normally however, on our arrival at the destination note, we will not want the shifting finger to be stopping both strings because this capo position seriously disturbs all aspects of our lefthand technique. To get out of the capo posture we use this identical “slither” technique, but now we need to do it during the shift. This technique can be worked on with the practice material offered near the bottom of this page (“Broken Capo Fifths With Shifts”).

OTHER PROBLEMS OF CAPO FIFTHS
While the “capo one-finger fifth technique” is very useful and is used frequently, it does however have certain other problems in addition to the need for finger preparation:
- NEED FOR GREAT FINGER PRESSURE.
To be able to stop two strings at once with the same finger requires lots of hand pressure, especially on the higher string of the two because that higher string is being stopped with the soft, mushy part of the finger (near the joint). Because of this, cellists with big strong hands and fingers find it easier to do these “capo fifths” than cellists with small, fine hands. How often do we see a cellist with a gigantic bear paw trying to show a matchstick-fingered cellist how to play a fifth on the fourth finger. This is like trying to show a small person how to do a slam-dunk in basketball: it just isn’t practical, and no amount of “technique” or practice will ever make it any easier (see Hand Size). The first (index) finger is usually the strongest finger, so even the very smallest hand can probably do a good capo fifth in the lower positions with this finger across two strings (just like for the guitar). But the further away we go from the index finger, the weaker the fingers become. Fifths on the fourth finger can become quite difficult – especially in double stops or singing legato passages.
Because of the softness of the part of the finger that is stopping the higher note of a capo fifth, the finger pressure can easily be not enough to make it sound properly. This lack of finger pressure on the higher note of a capo fifth manifests (shows itself) principally in two ways:
- its pitch is too low (flat) even though the finger’s position on the fingerboard might be correct, and
- its sound is ugly and unfocused.
For these reasons, if we continue playing with the same finger on the higher string after the capo fifth, we normally bring the finger over as soon as we can after the fifth, to allow us to once again be able to stop the string with the optimal part of the fingerpad. In other words, the “capo” finger posture is maintained for the absolute minimum time necessary for playing the fifth, and not a millisecond longer.
CAPO FIFTHS AND THUMB PRESSURE
Fifths, when played with one finger across the two strings (“capo” fifths), require a lot of additional finger pressure in order for the top note of the fifth to sound in tune. How do we achieve this pressure without using the “pincer” grip and its associated thumb pressure behind the cello’s neck ? Well, just think about how we solve this problem when playing our fifths on the thumb (in thumbposition): in this situation we obviously can’t use pressure of the thumb behind the cello neck because our thumb is on top of the fingerboard, so what do we do ? ! We simply need to use our chest, pushing against (or simply maintaining) the cello to counterbalance the additional hand weight that we are applying to the fingerboard.
ACHIEVING GREATER FINGER PRESSURE BY “STACKING” OR “SPLINTING” TWO FINGERS
Because of the extreme finger pressure required to firmly stop the two strings at the same time, we might want to give extra strength to the capo finger by stacking a neighbouring finger directly on top of the playing finger or at least squeezing a lower finger up tight behind it like a splint. These little tricks are especially useful when our capo fifth is played with one of the higher (third or fourth) fingers. For capo fifths on the fourth finger, we can place the third finger on top of (or beside) it while for third finger capos we can use the second finger for this extra support. For first finger capo fifths we can stack our second finger on top of the first. We cannot stack any other finger on the second finger because it is longer than all the others but we can bring the first finger tightly alongside it to give it extra support. Try these little tricks for each finger in the following sequences:
- NEED FOR AN ABNORMAL FINGER ANGLE
This increasing difficulty of playing fifths as we go from the first finger towards the fourth finger is not only because of the diminishing strength of the individual fingers, but also because of their decreasing perpendicularity to the fingerboard. The higher fingers are not just less strong, they are also less perpendicular (square) to the fingerboard which is a shame because in order to play a fifth in tune our “capo” finger needs to be at a right angle to the strings. These higher fingers, rather than being “square” to the fingerboard are increasingly angled “backwards”, with the fingertips pointing more towards the bridge.
We mentioned above how the softness of that part of the finger that is in contact with the higher string of the fifth requires extra pressure in order to effectively stop the string. Because of this softness, the effective finger pressure applied onto the higher string is often less than the finger pressure on the lower string. This means that the top note of the fifth often will sound a bit flat even when the stopping finger is at a “perfect” right angle to the string. And this means …….. that we often will need to angle the hand and finger not just at a perfect 90º to the string but past perpendicular – in the anti-natural direction in which the fingertips are pointing more towards the cello scroll.
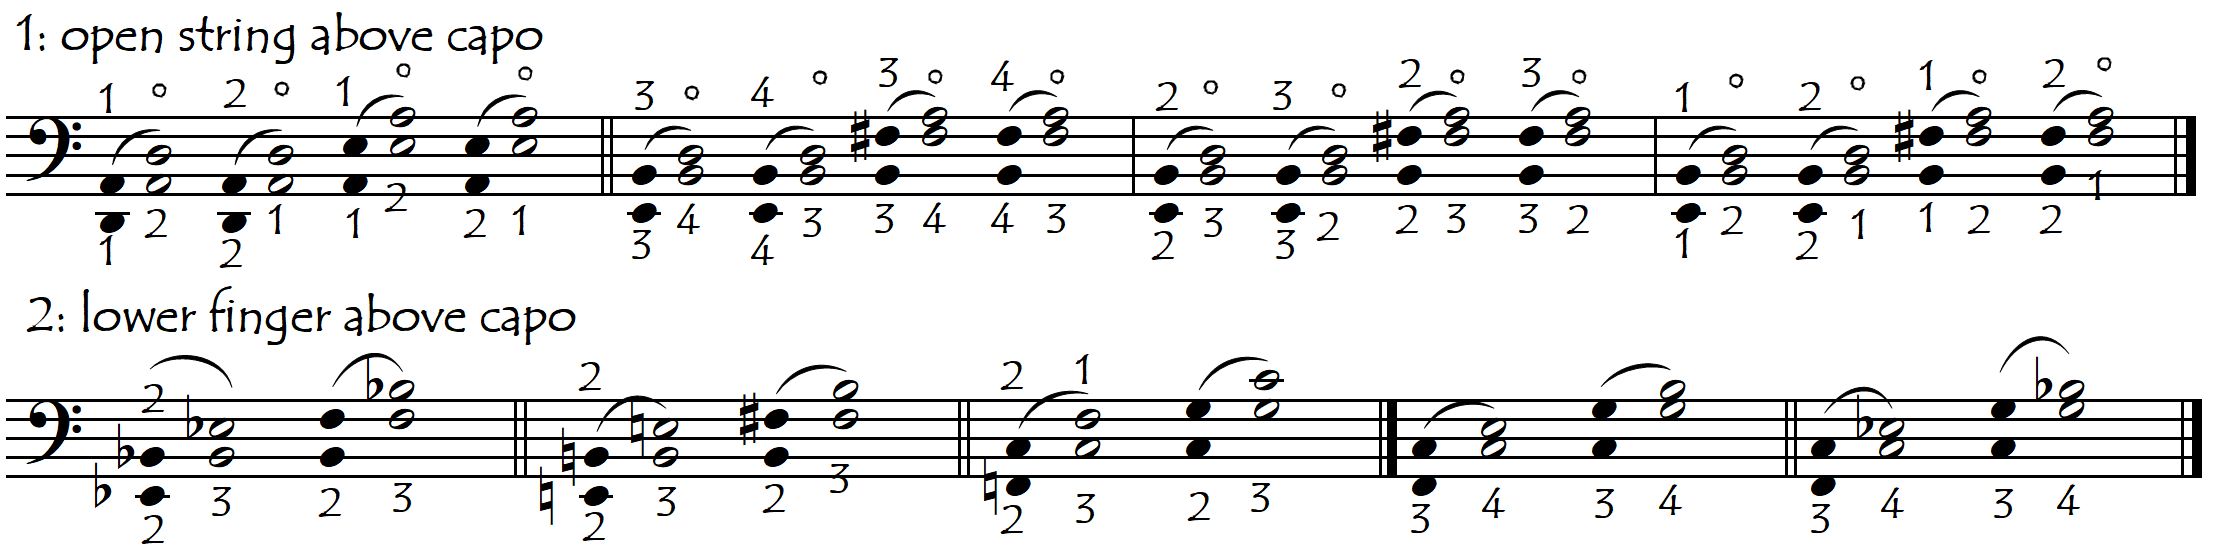
Unfortunately, added to these two complications is the fact that the instrument’s fifths are not parallel (see Fifths). This means that on the top and bottom pairs of strings we actually need to angle the capo finger even more in the direction that raises the pitch of the higher string note, which really can make our life difficult, especially on the higher fingers. To investigate which finger angle is neede on each pair of strings in order to achieve an in-tune capo fifth we can try the following little exercise on all three pairs of strings:

- DIFFICULTY OF THE CAPO FIFTH IN INTERMEDIATE AND THUMB POSITIONS
Small-handed cellists (who don’t have rubber finger joints) will probably find that the capo fifth, on any finger other than the thumb, is not very practical above the Neck Region. The extreme finger pressure and the twisted hand angle that are both required to make the fifth sound in tune, are just too unergonomic (uncomfortable, awkward). Normally, for playing fifths above the neck region, we will prefer to use our other “fifths techniques”. How would you finger the fifths in the following passage from the first movement of Saint Saens’ Concerto?

We have several possible choices of fingering:

For strong fingered cellists, the discomfort of capo fifths above the Neck Region can be overcome thanks to their finger strength and size. They will probably play the above passage as well as the following passage (also from the Saint Saens concerto first movement) using “capo” (one-finger) fifths, but cellists with smaller hands may find alternative fingerings easier (see the same example refingered on the Fifths page)).

- CAPO FIRST FINGER FIFTH WITH EXTD FOURTH FINGER ON LOWER STRING
The combination of the effort required to hold the capo fifth with the strain of reaching for the extended fourth finger on a lower string makes these finger combinations quite uncomfortable:


Here below are links to material for working on this problem:
Capo 1st Finger with Extended 4th Finger On Lower String: EXERCISES
Capo 1st Finger with Extended 4th Finger On Lower String: REPERTOIRE EXCERPTS
- CAPO FIFTHS WITH A LOWER FINGER (OR OPEN STRING) ON THE NEIGHBOURING HIGHER STRING
In chords (broken or sustained) the posture and pressure required to hold down a capo fifth on the lower string pair are such that our capo finger can very easily obstruct the vibration of the neighbouring higher string. Great finger flexibility is required in order to be able to hold down the capo fifth strongly on the lower strings without interfering with (obstructing) the higher string. People with double-jointed fingers that can curve in the opposite direction to the “claw” shape have an advantage, but not every hand can do this. The problem gets worse as the capo finger goes up the hand from the first finger out to the pinky (little finger). While most of us will be OK with the capo on the first finger, very few hands will be able to successfully play chords with a capo fifth on the fourth finger on the lower strings and a lower finger (or open string) on the next-higher string. Try the following chords to see which are possible and which are not.

The following link opens up a page of examples of all the different (non-dissonant) chords in which this situation is produced:
Capo On Lower String With Open String Or Lower Finger On Higher String: EXCS
For those chords of this type for which our hand is unable to play the capo fifth without disturbing the note on the top string, the solution is probably not to simply practise more, or to try harder: that would be a little like fighting against nature. Instead of banging our head against a wall, we will be better advised to find an alternative to the capo fifth fingering which allows us to sound that top note clearly and safely. Fortunately, these alternatives exist: we can do either a “squeeze fifth” or a “shift fifth” instead of our capo. Both of these techniques are described in detail on the “Fifths” page but we will give some examples here below of these special chordal situations and solutions.
1: SHIFT FIFTH INSTEAD OF CAPO
Here, after our capo on the lower string pair, we shift so the higher note of the capo is now played with a different finger. This is basically a simple finger substitution.
2: SQUEEZED FIFTH INSTEAD OF CAPO
Here, instead of using a capo to play the fifth on the lower string pair, we use a “squeezed fifth”:

- CAPO FIFTHS WITH HALF-RELEASE
Sometimes we need to get into (or out of) this posture from some strange situations in which the same capo finger alternates between capo and non-capo all the while maintaining the constant finger pressure on at least one of the strings. The following examples show some of these situations:
1: Placing The Finger Initially Only On The Lower String Then Stopping The Higher String Also

2: Placing The Finger Initially On Both Strings Then Removing It Only From The Top String While Still Keeping It On The Lower String

3: Placing The Finger Initially On Both Strings Then Sliding It Across To Only The Top String In Order To Free Up The Lower String

In all of the above examples, we need to release half of (one string) of the capo in order to allow another finger (or the open string) to sound, but all the while maintaining the finger stopped on the other string. Releasing and then restopping the higher string of the fifth (Donizetti and Sibelius examples) is much more natural than releasing and restopping the lower string (Mozart example). The links below take you to material in which we explore this problem in all its different permutations:
Capo Fifths With Half-Release: EXERCISES
Capo Fifths With Half-Release: REPERTOIRE EXCERPTS
PRACTICE MATERIAL FOR CAPO FIFTHS
Here are some links to “capo fifth” practice material. We will start with simple, double-stopped fifths before moving on to broken fifths. The broken fifths will be looked at firstly in one position, and then with shifts.
Mixed Finger Doublestopped Capo Fifths: EXERCISES REPERTOIRE EXCERPTS
Mixed Finger Broken Capo Fifths: EXERCISES REPERTOIRE EXCERPTS
Mixed Finger Broken Capo Fifths: With Shifts: EXERCISES REPERTOIRE EXCERPTS
And here are some links to even more specialised material for working on capo fifths on each of the individual fingers. Here we have separated the material according to whether the fifth is “from above” (more complicated) or “from below” (standard, easier). As usual, it is perhaps best to start with the easiest stuff first, so we will start with the first finger and work our way out to the pinky. This looks ridiculously detailed and perhaps it is, but capo fifths are so problematic that they are worth a little bit of investigation.
FIRST FINGER CAPO FIFTH PRACTICE MATERIAL
1st Finger Capo: Doublestopped and Broken From Below (No Shifts): EXERCISES REPERTOIRE EXCERPTS
1st Finger Broken Capo From Above (No Shifts): EXERCISES REPERTOIRE EXCERPTS
1st Finger Broken Capo From Below: With Shift To Higher String: EXERCISES REPERTOIRE EXCERPTS
1st Finger Broken Capo From Above: With Shift To Lower String: EXERCISES REPERTOIRE EXCERPTS
SECOND FINGER CAPO FIFTH PRACTICE MATERIAL
2nd Finger Capo: Doublestopped and Broken From Below (No Shifts): EXERCISES REPERTOIRE EXCERPTS
2nd Finger Broken Capo From Above (No Shifts): EXERCISES REPERTOIRE EXCERPTS
2nd Finger Broken Capo: From Below: With Shift To Higher String: EXERCISES REPERTOIRE EXCERPTS
2nd Finger Capo From Above With Shift To Lower String: EXERCISES REPERTOIRE EXCERPTS
THIRD FINGER CAPO FIFTH PRACTICE MATERIAL
3rd Finger Capo: Doublestopped and Broken From Below (No Shifts): EXERCISES REPERTOIRE EXCERPTS
3rd Finger Broken Capo From Above (No Shifts): EXERCISES REPERTOIRE EXCERPTS
3rd Finger Broken Capo: From Below: With Shift To Higher String: EXERCISES REPERTOIRE EXCERPTS
3rd Finger Capo From Above With Shift To Lower String: EXERCISES REPERTOIRE EXCERPTS
FOURTH FINGER CAPO FIFTH PRACTICE MATERIAL
4th Finger Capo: Doublestopped and Broken From Below (No Shifts): EXERCISES REPERTOIRE EXCERPTS
4th Finger Broken Capo From Above (No Shifts): EXERCISES REPERTOIRE EXCERPTS
4th Finger Broken Capo: From Below: With Shift To Higher String: EXERCISES REPERTOIRE EXCERPTS
4th Finger Fifths From Above With Shift To Lower String: EXERCISES REPERTOIRE EXCERPTS